CDL SECTION 6: COMBINATION VEHICLES
This section covers:
- Driving Combinations
- Combination Vehicle Air Brakes
- Antilock Brake Systems
- Coupling and Uncoupling
- Inspecting Combinations
This section provides the information needed to pass the tests for combination vehicles (tractor-trailers, doubles, triples, straight trucks with trailers.) The information is intended only to provide you with the minimum knowledge needed to drive common combination vehicles. You should also study Section 7 if you need to pass the test for doubles and triples.
6.1 Driving Combination Vehicles Safely
Combination vehicles are usually heavier, longer, and require more driving skill than single commercial vehicles. This means that drivers of combination vehicles need more knowledge and skill than drivers of single vehicles. In this section, we give important safety factors that apply specifically to combination vehicles.
6.1.1 - ROLLOVER RISKS
More than half of truck driver deaths in crashes are the result of truck rollovers. When more cargo is piled up in a truck, the "center of gravity" moves higher up from the road. The truck becomes easier to turn over. Fully loaded rigs are ten times more likely to roll over in a crash than empty rigs. The following two things will help you prevent rollover:
- Keep the cargo as close to the ground as possible, and drive slowly around turns. Keeping cargo low is even more important in combination vehicles than in straight trucks.
- Keep the load centered on your rig. If the load is to one side, it makes the trailer lean, and a rollover is more likely. Make sure your cargo is centered and spread out as much as possible. (Cargo distribution is covered in Section 3 of this manual.)
Rollovers happen when you turn too fast. Drive slowly around corners, on ramps, and off ramps. Avoid quick lane changes, especially when fully loaded.
6.1.2 - STEER GENTLY
Trucks with trailers have a dangerous "crack-the-whip" effect. When you make a quick lane change, the crack-the-whip effect can turn the trailer over. There are many accidents where only the trailer has overturned.
"Rearward amplification" causes the crack-the-whip effect. Figure 6.1 shows eight types of combination vehicles, and the rearward amplification each has in a quick lane change. Rigs with the least crack-the-whip effect are shown at the top, and those with the most, at the bottom. Rearward amplification of 2.0 in the chart means that the rear trailer is twice as likely to turn over as the tractor. You can see that triples have a rearward amplification of 3.5. This means you can roll the last trailer of triples 3.5 times as easily as a five-axle tractor.
Steer gently and smoothly when you are pulling trailers. If you make a sudden steering wheel movement, your trailer could tip over. Follow far enough behind other vehicles (at least one second for each 10 feet of your vehicle length, plus another second if going over 40 mph.) Look far enough down the road to avoid being surprised and having to make a sudden lane change. At night, drive slowly enough to see obstacles with your headlights before it is too late to change lanes or stop gently. Slow down to a safe speed before going into a turn.
6.1.3 - BRAKE EARLY
Control your speed whether fully loaded or empty. Large combination vehicles take longer to stop when empty than when fully loaded. When lightly loaded, the very stiff suspension springs and strong brakes provide poor traction, making it very easy to lock the wheels. Your trailer can swing out and strike other vehicles. Your tractor can jackknife very quickly. You also must be very careful about driving "bobtail" tractors (tractors without semitrailers.) Tests have shown that bobtails can be very hard to stop smoothly. It takes them longer to stop than a tractor-semitrailer loaded to maximum gross weight.
In any combination rig, allow lots of following distance and look far ahead, so you can brake early. Don't be caught by surprise and have to make a "panic" stop.
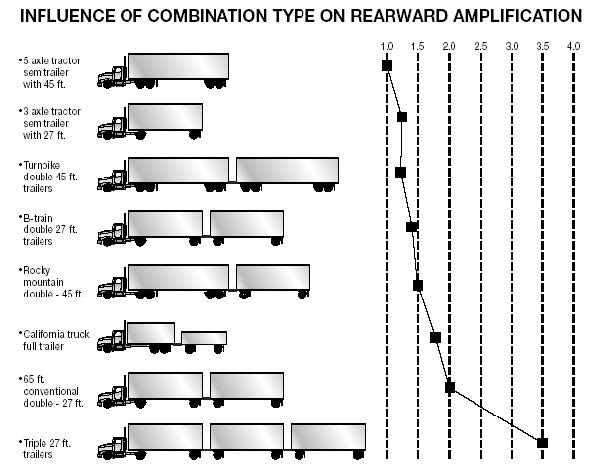
Figure 6.1
6.1.4 - RAILROAD-HIGHWAY CROSSINGS
Railroad-highway crossings can also cause problems, particularly when pulling trailers with low underneath clearance. These trailers can get stuck on raised crossings:
- Low slung units (lowboy, car carrier, moving van, possum-belly livestock trailer.)
- Single-axle tractor pulling a long trailer with its landing gear set to accommodate a tandem-axle tractor.
If for any reason you get stuck on the tracks, get out of the vehicle and away from the tracks. Check signposts or signal housing at the crossing for emergency notification information. Call 911 or another emergency number. Give the location of the crossing using all identifiable landmarks, especially the DOT number, if posted.
6.1.5 - PREVENT TRAILER SKIDS
When the wheels of a trailer lock up, the trailer will tend to swing around. This is more likely to happen when the trailer is empty or lightly loaded. This type of jackknife is often called a "trailer jackknife." See Figure 6.2. The procedure for stopping a trailer skid is:
Recognize the Skid
The earliest and best way to recognize that the trailer has started to skid is by seeing it in your mirrors. Any time you apply the brakes hard, check the mirrors to make sure the trailer stays where it should. Once the trailer swings out of your lane, it's very difficult to prevent a jackknife.
*(From R.D. Ervin, R.L. Nisconger, C.C. MacAdam, and P.S. Fancher, “Influence of size and weight variables on the stability and control properties of heavy trucks, “University of Michigan Transportation Research Institute, 1983.)
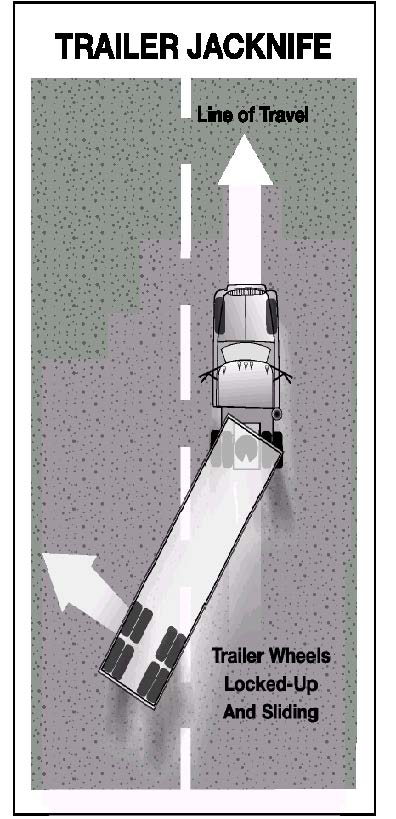
Figure 6.2
Stop Using the Brake
Release the brakes to regain traction. Do not use the trailer hand brake (if you have one) to "straighten out the rig." This is the wrong thing to do since the brakes on the trailer wheels caused the skid in the first place. Once the trailer wheels grip the road again, the trailer will start to follow the tractor and straighten out.
6.1.6 - TURN WIDE
When a vehicle goes around a corner, the rear wheels follow a different path from the front wheels. This is called off-tracking or "cheating." Figure 6.3 shows how off-tracking causes the path followed by a tractor to be wider than the rig itself. Longer vehicles will off-track more. The rear wheels of the powered unit (truck or tractor) will off-track some, and the trailer's rear wheels will off-track even more. If there is more than one trailer, the rear wheels of the last trailer will off-track the most. Steer the front end wide enough around a corner so the rear end does not run over the curb, pedestrians, etc. However, keep your vehicle's rear close to the curb. This will stop other drivers from passing you on the right. If you cannot complete your turn without entering another traffic lane, turn wide as you complete the turn. This is better than swinging wide to the left before starting the turn because it will keep other drivers from passing you on the right. See Figure 6.4.
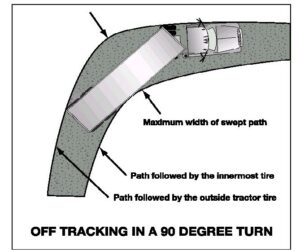
Figure 6.3
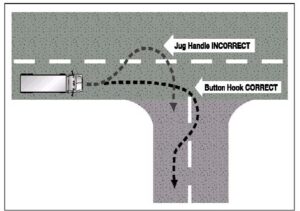
Figure 6.4
6.1.7 - BACKING WITH A TRAILER
When backing a car, straight truck, or bus, you turn the top of the steering wheel in the direction you want to go. When backing a trailer, you turn the steering wheel in the opposite direction. Once the trailer starts to turn, you must turn the wheel the other way to follow the trailer.
Whenever you back up with a trailer, try to position your vehicle so you can back in a straight line. If you must back on a curved path, back to the driver's side so you can see. See Figure 6.5.
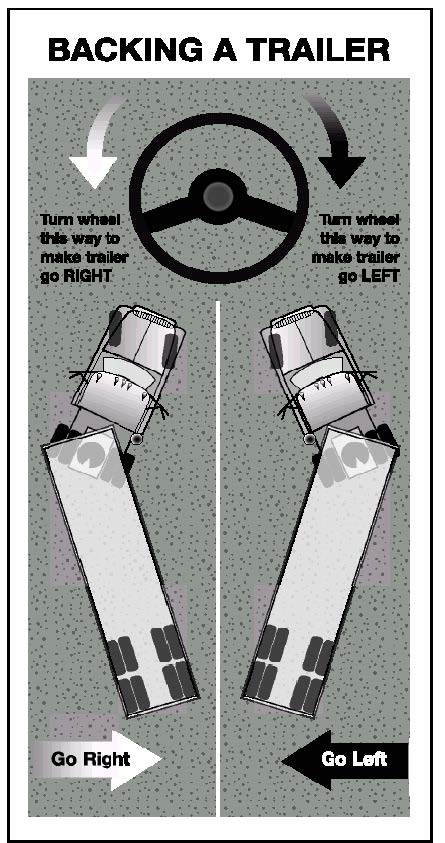
Figure 6.5
Look at Your Path
Look at your line of travel before you begin. Get out and walk around the vehicle. Check your clearance to the sides and overhead, in and near the path of your vehicle.
Use Mirrors on Both Sides
Check the outside mirrors on both sides frequently. Get out of the vehicle and re-inspect your path if you are unsure.
Back Slowly
This will let you make corrections before you get too far off course.
Correct Drift Immediately
As soon as you see the trailer getting off the proper path, correct it by turning the top of the steering wheel in the direction of the drift.
Pull Forward
When backing a trailer, make pullups to re-position your vehicle as needed.
SUBSECTION 6.1 - TEST YOUR KNOWLEDGE
- What two things are important to prevent rollover?
- When you turn suddenly while pulling doubles, which trailer is most likely to turn over?
- Why should you not use the trailer hand brake to straighten out a jackknifing trailer?
- What is off-tracking?
- When you back a trailer, you should position your vehicle so you can back in a curved path to the driver’s side. True or False?
- What type of trailers can get stuck on railroad-highway crossings?
These questions may be on your test. If you can’t answer them all, re-read subsection 6.1.
6.2 Combination Vehicle Air Brakes
You should study Section 5: Air Brakes before reading this. In combination vehicles, the braking system has parts to control the trailer brakes, in addition to the parts described in Section 5. These parts are described below.
6.2.1 - TRAILER HAND VALVE
The trailer hand valve (also called the trolley valve or Johnson bar) works the trailer brakes. The trailer hand valve should be used only to test the trailer brakes. Do not use it while driving due to the risk of causing the trailer to skid. The foot brake sends air to all of the brakes on the vehicle (including the trailer(s)). There is much less danger of causing a skid or jackknife when using just the foot brake.
Never use the hand valve for parking because all the air might leak out, unlocking the brakes (in trailers that don't have spring brakes.) Always use the parking brakes when parking. If the trailer does not have spring brakes, use wheel chocks to keep the trailer from moving.
6.2.2 - TRACTOR PROTECTION VALVE
The tractor protection valve keeps air in the tractor or truck brake system, should the trailer break away or develop a bad leak. The tractor protection valve is controlled by the "trailer air supply" control valve in the cab. The control valve allows you to open and shut the tractor protection valve. The tractor protection valve will close automatically if air pressure is low (in the range of 20 to 45 psi.) When the tractor protection valve closes, it prevents any air from leaving the tractor. It also lets the air out of the trailer emergency line. This causes the trailer's emergency brakes to come on, with possible loss of control. (Emergency brakes are covered later.)
6.2.3 - TRAILER AIR SUPPLY CONTROL
The trailer air supply control on newer vehicles is a red eight-sided knob, which you use to control the tractor protection valve. You push it in to supply the trailer with air, then pull it out to shut off the air and put on the trailer's emergency brakes. The valve will pop out (thus closing the tractor protection valve) when the air pressure drops into the range of 20 to 45 psi. Tractor protection valve controls or "emergency" valves on older vehicles may not operate automatically. There may be a lever rather than a knob. The "normal" position is used for pulling a trailer. The "emergency" position is used to shut off the air and apply the trailer's emergency brakes.
6.2.4 - TRAILER AIR-LINES
Every combination vehicle has two air-lines, the service line and the emergency line. They run between each vehicle (tractor-to-trailer, trailer-to-dolly, dolly-to-second-trailer, etc.).
Service Air-Line
The service line (also called the control line or signal line) carries air, which is controlled by the foot brake or the trailer hand brake. Depending on how hard you press the foot brake or hand valve, the pressure in the service line will similarly change. The service line is connected to relay valves. These valves allow the trailer brakes to be applied more quickly than would otherwise be possible.
Emergency Air-Line
The emergency line (also called the supply line) has two purposes. First, it supplies air to the trailer air tanks. Second, the emergency line controls the emergency brakes on combination vehicles. Loss of air pressure in the emergency line causes the trailer emergency brakes to come on. The pressure loss could be caused by a trailer breaking loose and tearing the emergency air hose. Or it could be caused by a hose, metal tubing, or another part breaking and letting the air out. When the emergency line loses pressure, it also causes the tractor protection valve to close (the air supply knob will pop out.)
Emergency lines are often coded in red (red hose, red couplers, or other parts) to avoid confusion with the blue service line.
6.2.5 - HOSE COUPLERS (GLAD HANDS)
Glad hands are coupling devices used to connect the service and emergency air-lines from the truck or tractor to the trailer. The couplers have a rubber seal, which prevents air from escaping. Clean the couplers and rubber seals before a connection is made. When connecting the glad hands, press the two seals together with the couplers at a 90-degree angle to each other. A turn of the glad hand attached to the hose will join and lock the couplers.
When coupling, make sure to use the proper glad hands. To help avoid mistakes, colors are sometimes used. Blue is used for the service lines and red for the emergency (supply) lines. Sometimes, metal tags are attached to the lines with the words "service" and "emergency" stamped on them. See Figure 6.6
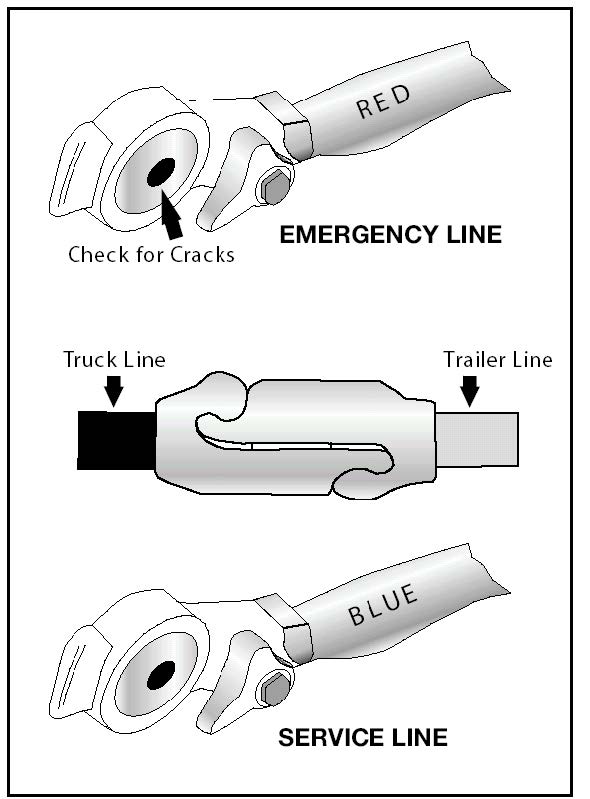
Figure 6.6
If you do cross the air-lines, supply air will be sent to the service line instead of going to charge the trailer air tanks. Air will not be available to release the trailer's spring brakes (parking brakes.) If the spring brakes don't release when you push the trailer air supply control, check the air-line connections.
Older trailers do not have spring brakes. If the air supply in the trailer air tank has leaked away, there will be no emergency brakes, and the trailer wheels will turn freely. If you crossed the air-lines, you could drive away, but you wouldn't have trailer brakes. This would be very dangerous. Always test the trailer brakes before driving with the hand valve or by pulling the air supply (tractor protection valve) control. Pull gently against them in a low gear to make sure the brakes work.
Some vehicles have "dead end" or dummy couplers to which the hoses may be attached when they are not in use. This will prevent water and dirt from getting into the coupler and the airlines. Use the dummy couplers when the air-lines are not connected to a trailer. If there are no dummy couplers, the glad hands can sometimes lock together (depending on the couplings.) It is very important to keep the air supply clean.
6.2.6 - TRAIL AIR TANKS
Each trailer and converter dolly has one or more air tanks. They are filled by the emergency (supply) line from the tractor. They provide the air pressure used to operate trailer brakes. Air pressure from the air tanks is sent to the brakes via relay valves.
The pressure in the service line tells how much pressure the relay valves should send to the trailer brakes. The pressure in the service line is controlled by the brake pedal (and the trailer hand brake.)
It is important that you don't let water and oil build up in the air tanks. If you do, the brakes may not work correctly. Each tank has a drain valve; you should drain it every day. If your tanks have automatic drains, they will keep most moisture out. But you should still open the drains to make sure.
6.2.7 - SHUT-OFF VALVES
Shut-off valves (also called cut-out cocks) are used in the service and supply air-lines at the back of trailers used to tow other trailers. These valves permit closing the air-lines off when another trailer is not being towed. You must check that all shut-off valves are in the open position except the ones at the back of the last trailer, which must be closed.
6.2.8 - TRAILER SERVICE, PARKING, AND EMERGENCY BRAKES
Newer trailers have spring brakes just like trucks and truck tractors. However, converter dollies and trailers built before 1975 are not required to have spring brakes. Those that do not have spring brakes have emergency brakes that operate from the air stored in the trailer air tank. The emergency brakes come on whenever air pressure in the emergency line is lost. These trailers have no parking brake. The emergency brakes come on
whenever the air supply knob is pulled out or the trailer is disconnected. A major leak in the emergency line will cause the tractor protection valve to close and the trailer emergency brakes to come on. But the brakes will hold only as long as there is air pressure in the trailer air tank. Eventually, the air will leak away, and then there will be no brakes. Therefore, it is very important for safety that you use wheel chocks when you park trailers without spring brakes.
You may not notice a major leak in the service line until you try to put the brakes on. Then, the air loss from the leak will lower the air tank pressure quickly. If it goes low enough, the trailer's emergency brakes will come on.
SUBSECTION 6.2 - TEST YOUR KNOWLEDGE
- Why should you not use the trailer hand valve while driving?
- Describe what the trailer air supply control does.
- Describe what the service line is for.
- What is the emergency air-line for?
- Why should you use chocks when parking a trailer without spring brakes?
- Where are shut-off valves?
These questions may be on your test. If you can’t answer them all, re-read subsection 6.2.
6.3 Antilock Brake Systems
6.3.1 - TRAILERS REQUIRED TO HAVE ABS
All trailers and converter dollies built on or after March 1, 1998, must have ABS. However, many trailers and converter dollies built before this date have been voluntarily equipped with ABS.
Trailers will have yellow ABS malfunction lamps on the left side, either on the front or rear corner. See Figure 6.7. Dollies manufactured on or after March 1, 1998, are required to have a lamp on the left side.
For vehicles manufactured before the required date, it may be difficult to determine whether the unit is equipped with ABS. Look under the vehicle for the ECU and wheel speed sensor wires coming from the back of the brakes.
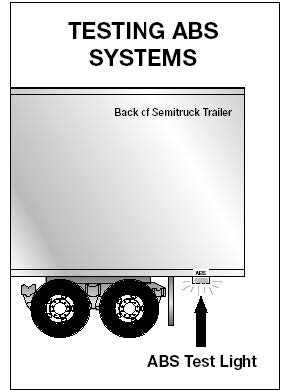
Figure 6.7
6.3.2 - BRAKING WITH ABS
ABS is an addition to your normal brakes. It does not decrease or increase your normal braking capability. ABS only activates when wheels are about to lock up.
ABS does not necessarily shorten your stopping distance, but it does help you keep the vehicle under control during hard braking. ABS helps you avoid wheel lockup. The computer senses impending lockup, reduces the braking pressure to a safe level, and you maintain control.
Having ABS on only the trailer, or even on only one axle, still gives you more control over the vehicle during braking.
When only the trailer has ABS, it's less likely to swing out. If you lose steering control or start a tractor jackknife, let up on the brakes (if you can safely do so) until you regain control.
When you drive a tractor-trailer combination with ABS, you should brake as you always have. In other words:
- Use only the braking force necessary to stop safely and stay in control.
- Brake the same way, regardless of whether you have ABS on the tractor, the trailer, or both.
- As you slow down, monitor your tractor and trailer and back off the brakes (if it is safe to do so) to stay in control.
Remember, if your ABS malfunctions, you still have regular brakes. Drive normally, but get the system serviced soon. ABS won’t allow you to drive faster, follow more closely, or drive less carefully.
6.4 Coupling and Uncoupling
Knowing how to couple and uncouple correctly is basic to the safe operation of combination vehicles. Wrong coupling and uncoupling can be very dangerous. General coupling and uncoupling steps are listed below. There are differences between different rigs, so learn the details of coupling and uncoupling the truck(s) you will operate.
6.4.1 - COUPLING TRACTOR-SEMITRAILERS
Step 1. Inspect Fifth Wheel
- Check for damaged/missing parts.
- Check that the mounting to the tractor is secure, that there are no cracks in the frame, etc.
- Be sure that the fifth wheel plate is greased as required. Failure to keep the fifth wheel plate lubricated can cause steering problems due to friction between the tractor and trailer.
- Check if the fifth wheel is in the proper position for coupling:
- Wheel tilted down toward the rear of the tractor.
- Jaws open.
- Safety unlocking handle in the automatic lock position.
- If you have a sliding fifth wheel, make sure it is locked.
- Make sure the trailer kingpin is not bent or broken.
Step 2. Inspect Area and Chock Wheels
- Make sure the area around the vehicle is clear.
- Be sure trailer wheels are chocked, or spring brakes are on.
- Check that cargo (if any) is secured against movement due to the tractor being coupled to the trailer.
Step 3. Position Tractor
- Put the tractor directly in front of the trailer. (Never back under the trailer at an angle because you might push the trailer sideways and break the landing gear.)
- Check position, using outside mirrors, by looking down both sides of the trailer.
Step 4. Back Slowly
- Back up until the fifth wheel just touches the trailer.
- Don't hit the trailer.
Step 5. Secure Tractor
- Put on the parking brake.
- Put the transmission in neutral.
Step 6. Check Trailer Height
- The trailer should be low enough that it is raised slightly by the tractor when the tractor is backed under it. Raise or lower the trailer as needed. (If the trailer is too low, the tractor may strike and damage the trailer nose; if the trailer is too high, it may not couple correctly.)
- Check that the kingpin and fifth wheel are aligned.
Step 7. Connect Air-Lines to Trailer
- Check the glad hand seals and connect the tractor emergency air-line to the trailer emergency glad hand.
- Check glad hand seals and connect tractor service air-line to trailer service glad hand.
- Make sure air-lines are safely supported where they won't be crushed or caught while the tractor is backing under the trailer.
Step 8. Supply Air to Trailer
- From the cab, push in the "air supply" knob or move the tractor protection valve control from the "emergency" to the "normal" position to supply air to the trailer brake system.
- Wait until the air pressure is normal.
- Check brake system for crossed air-lines.
- Shut the engine off so you can hear the brakes.
- Apply and release trailer brakes and listen for the sound of trailer brakes being applied and released. You should hear the brakes move when applied and air escape when the brakes are released.
- Check the air brake system pressure gauge for signs of major air loss.
- When you are sure trailer brakes are working, start the engine.
- Make sure air pressure is up to normal.
Step 9. Lock Trailer Brakes
- Pull out the "air supply" knob or move the tractor protection valve control from "normal" to "emergency."
Step 10. Back Under Trailer
- Use the lowest reverse gear.
- Back tractor slowly under trailer to avoid hitting the kingpin too hard.
- Stop when the kingpin is locked into the fifth wheel.
Step 11. Check Connection for Security
- Raise trailer landing gear slightly off the ground.
- Pull the tractor gently forward while the trailer brakes are still locked to check that the trailer is locked onto the tractor.
Step 12. Secure Vehicle
- Put the transmission in neutral.
- Put parking brakes on.
- Shut off the engine and take the key with you so someone else won't move the truck while you are under it.
Step 13. Inspect Coupling
- Use a flashlight, if necessary.
- Make sure there is no space between the upper and lower fifth wheel. If there is space, something is wrong (the kingpin may be on top of the closed fifth-wheel jaws, and the trailer would come loose very easily.)
- Go under the trailer and look into the back of the fifth wheel. Make sure the fifth wheel jaws have closed around the shank of the kingpin.
- Check that the locking lever is in the "lock" position.
- Check that the safety latch is in position over the locking lever. (On some fifth-wheels, the catch must be put in place by hand.)
- If the coupling isn't right, don't drive the coupled unit; get it fixed.
Step 14. Connect the Electrical Cord and Check Air-Lines
- Plug the electrical cord into the trailer and fasten the safety catch.
- Check both air lines and electrical lines for signs of damage.
- Make sure air and electrical lines will not hit any moving parts of the vehicle.
Step 15. Raise Front Trailer Supports (Landing Gear)
- Use low gear range (if so equipped) to begin raising the landing gear. Once free of weight, switch to the high gear range.
- Raise the landing gear all the way up. (Never drive with the landing gear only partway up, as it may catch on railroad tracks or other things.)
- After raising the landing gear, secure the crank handle safely.
- When the full weight of the trailer is resting on the tractor:
- Check for enough clearance between the rear of the tractor frame and the landing gear. (When the tractor turns sharply, it must not hit the landing gear.)
- Check that there is enough clearance between the top of the tractor tires and the nose of the trailer.
Step 16. Remove Trailer Wheel Chocks
- Remove and store wheel chocks in a safe place.
6.4.2 - UNCOUPLING TRACTOR-SEMITRAILERS
The following steps will help you to uncouple safely.
Step 1. Position Rig
- Make sure the surface of the parking area can support the weight of the trailer.
- Have the tractor lined up with the trailer. (Pulling out at an angle can damage the landing gear.)
Step 2. Ease Pressure on Locking Jaws
- Shut off trailer air supply to lock trailer brakes.
- Ease pressure on the fifth wheel locking jaws by backing up gently. (This will help you release the fifth wheel locking lever.)
- Put the parking brakes on while the tractor is pushing against the kingpin. (This will hold the rig with pressure off the locking jaws.)
Step 3. Chock Trailer Wheels
- Chock the trailer wheels if the trailer doesn't have spring brakes or if you're not sure. (The air could leak out of the trailer air tank, releasing its emergency brakes. Without chocks, the trailer could move.)
Step 4. Lower the Landing Gear
- If the trailer is empty, lower the landing gear until it makes firm contact with the ground.
- If the trailer is loaded, after the landing gear makes firm contact with the ground, turn the crank in low gear a few extra turns. This will lift some weight off the tractor. (Do not lift the trailer off the fifth wheel.) This will:
- Make it easier to unlatch the fifth wheel.
- Make it easier to couple next time.
Step 5. Disconnect the Air-Lines and the Electrical Cable
- Disconnect air-lines from trailer. Connect air-line glad hands to dummy couplers at the back of the cab or couple them together.
- Hang the electrical cable with the plug down to prevent moisture from entering it.
- Make sure lines are supported so they won't be damaged while driving the tractor.
Step 6. Unlock Fifth Wheel
- Raise the release handle lock.
- Pull the release handle to the "open" position.
- Keep legs and feet clear of the rear tractor wheels to avoid serious injury in case the vehicle moves.
Step 7. Pull Tractor Partially Clear of Trailer
- Pull the tractor forward until the fifth wheel comes out from under the trailer.
- Stop with the tractor frame under the trailer (prevents trailer from falling to the ground if the landing gear should collapse or sink.)
Step 8. Secure Tractor
- Apply parking brake.
- Place transmission in neutral.
Step 9. Inspect Trailer Supports
- Make sure the ground is supporting the trailer.
- Make sure landing gear is not damaged.
Step 10. Pull Tractor Clear of Trailer
- Release parking brakes.
- Check the area and drive the tractor forward until it clears.
SUBSECTION 6.3 and 6.4 - TEST YOUR KNOWLEDGE
- What might happen if the trailer is too high when you try to couple?
- After coupling, how much space should be between the upper and lower fifth wheel?
- You should look into the back of the fifth wheel to see if it is locked onto the kingpin. True or False?
- To drive, you need to raise the landing gear only until it just lifts off the pavement. True or False?
- How do you know if your trailer is equipped with antilock brakes?
These questions may be on your test. If you can’t answer all of them, re-read subsections 6.3 and 6.4.
6.4.3 - COUPLING A PINTLE HOOK
Step 1. Inspect Pintle Hook
- Before operating, check for worn, damaged, or missing parts, and make sure the mount is secure. If the pintle hook is not secured to the mounting surface, the pintle hook could separate from the vehicle, which, if not avoided, could result in death or serious injury.
Step 2. Unlock Lock Pin and Open Latch
- Unlock and remove the tethered lock pin, if applicable. See Figure 16.
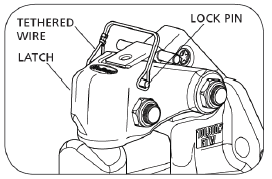
Figure 16
- Lift the lock handle away from the vehicle until the lock clears the lock seat on the hook body. Open the latch by rotating the latch assembly up toward the vehicle until the latch is in its most upright position, then release the lock handle. See Figures 17 and 18.
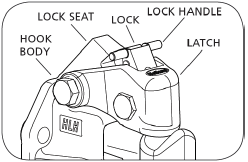
Figure 17
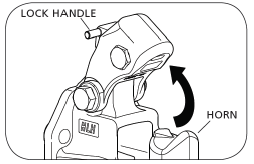
Figure 18
Step 3. Lower the drawbar into Place
- Position the drawbar eye over the horn of the pintle hook and lower it into place.
Step 4. Lock Pintle Hook
- Push the latch closed. When correctly locked, the lock handle will rotate and move up until it is flush with the top of the latch. See Figure 19.
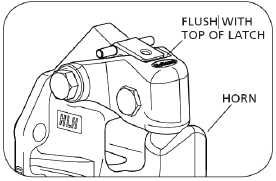
Figure 19
- Insert the tethered lock pin through the latch and lock holes, and close the tethered wire lock pin, if applicable. See Figure 16.
- Failure to correctly lock the latch can result in separation of the trailer and vehicle, which, if not avoided, could result in death or serious injury.
6.4.4 - UNCOUPLING A PINTLE HOOK
Step 1. Park on a Level Surface
- Park the trailer on a firm level surface and block trailer tires.
Step 2. Disconnect Electrical Connector, Breakaway Brake Switch, and Safety Chains
- Disconnect electrical connector.
- Disconnect breakaway brake switch lanyard.
- Disconnect safety chains from the tow vehicle.
Step 3. Unlock the Coupler
- Unlock the coupler and open it.
Step 4. Check Ground Surface for Correct Support
- Before extending the jack, make certain the ground surface below the jack pad will support the tongue load.
Step 5. Rotate Jack Handle
- Rotate the jack handle to extend the jack and transfer the weight of the trailer tongue to the jack.
Step 6. Raise Trailer Coupler
- Raise the trailer coupler above the tow vehicle hitch.
Step 7. Drive Forward
- Drive the tow vehicle forward.
6.4.5 - COUPLING A DRAWBAR
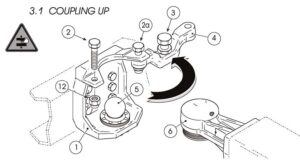
Step 1. Remove Safety Lock Screw and Rotate Safety Cover Bar
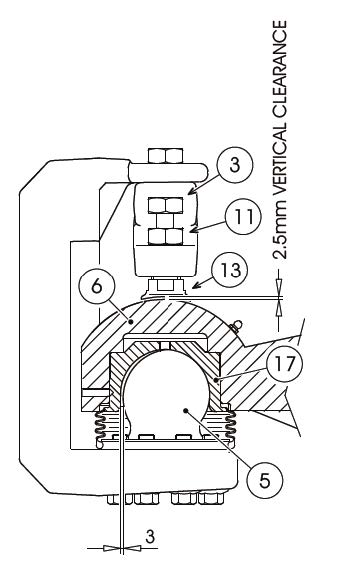
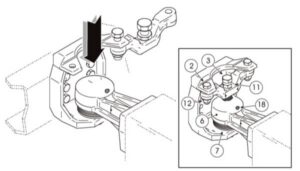
- Remove safety lock screw (2), recover and keep the relative self-locking nut (12) aside, then also loosen safety lock screw (2a) and turn out the adjustment screw (3) by at least five turns. Rotate the safety cover bar (4) outwards so that it is completely open.
Step 2. Reverse Truck
- Reverse the truck very slowly until the ball cup drawbar eye (6) is in position exactly above the drawbar coupling ball (5).
Step 3. Lower the Drawbeam
- Lower the drawbeam until the ball cup drawbar eye (6) lies completely covering the drawbar coupling ball (5).
Step 4. Rotate the Safety Cover Bar
- Rotate the safety cover bar back inwards (4) and fit the safety lock screw (2) together with its self-locking nut.
- Tighten in both the lock screws (2, 2a) together with their relative self-locking nuts (12, 12a) at a 350 to 400 Nm torque wrench setting.
Step 5. Adjust the Adjustment Screw
- Adjust the adjustment screw (3) until a 0.3 - 0.5 mm vertical clearance between the guard disk (13) and the ball cup (6) is reached. Lock setting with counter nut (11).
- In the event that the safety cover bar (4) will not perfectly lodge into its seating appropriately, travel is strictly forbidden.
Step 6. Protect the Coupling Ball and Anchor Edge on the Ball
- Protect the part that is still visible of the coupling ball (5) with the rubber dust-proof bellows protection cover (7). Accurately anchor the edge directly onto the ball itself.
Step 7. Lubricate the Drawbar Eye
- Lubricate the inside of the drawbar eye ball cup (6) directly through the grease nipple. See Figure 18.
6.4.6 - UNCOUPLING A DRAWBAR
Step 1. Turn Trailer Brake On
- Make sure that the trailer brake is on.
Step 2. Remove Cover and Loosen Screws
- Remove the rubber dust-proof bellows protection cover (7).
- Loosen the adjustment screw (3) and the counter nut (11).
- Loosen safety lock screw (2a) and remove safety lock screw (2) together with its self-locking nut (12).
Step 3. Rotate Safety Cover Bar and Lift Trailer Drawbeam
- Rotate the safety cover bar (4) outwards so that it is completely open.
- Lift the trailer drawbeam until the drawbar coupling ball (5) is fully visible, then travel forward with the trailer very slowly.
- Rotate the safety cover bar inwards (4) until it lodges back in its housing.
Step 4. Lock Safety Screw and Tighten Self-Locking Nut
- Fit in safety lock screw (2) and tighten in self-locking nut (12).
6.4.7 - COUPLING A GOOSENECK HITCH
If you are hooking up a Gooseneck or a fifth wheel hitch, the procedure is a little different from a receiver and ball, but it is not more difficult.
Step 1. Open the Latch and Lubricate the Gooseneck Ball
- Open the clamp latch on the Gooseneck coupler. Make sure that the Gooseneck ball is properly lubricated.
Step 2. Position Coupler and Latch the Clamp
- Position the trailer's coupler directly over the ball and lower the Gooseneck trailer into position and latch the clamp.
Step 3. Attach Safety Chains
- Attach your safety chains. Remember that all trailers are required by law to have safety chains.
Step 4. Connect Trailer Light Wiring
- Connect your trailer light wiring to your vehicle's connector.
- Check all of your lights, including your brake lights.
Step 5. Lower and Stow the Trailer Jacks
- Completely lower and stow the trailer jacks, allowing the weight to settle onto the tow vehicle.
6.4.8 - UNCOUPLING A GOOSENECK HITCH
Step 1. Remove Safety Pin and Clip
- Simply remove the safety pin and clip.
Step 2. Rotate Handle and Raise Trailer Off Ball
- Rotate the handle to this position (See Figure B) and raise the trailer off the ball. The coupler will automatically return to the load position.
Step 3. Install Safety Pin and Clip
- Install safety pin and clip. See Figure B.
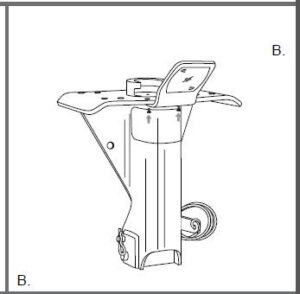
Figure B
6.5 Inspecting a Combination Vehicle
Use the seven-step inspection procedure described in Section 2 to inspect your combination vehicle. There are more things to inspect on a combination vehicle than on a single vehicle. (Example: tires, wheels, lights, reflectors, etc.) However, there are also some new things to check. These are discussed below.
6.5.1 - ADDITIONAL THINGS TO CHECK DURING A WALK-AROUND INSPECTION
Do these checks in addition to those already listed in Section 2.
Coupling System Areas
- Check fifth wheel (lower).
- Securely mounted to the frame.
- No missing or damaged parts.
- Enough grease.
- No visible space between upper and lower fifth wheel.
- Locking jaws around the shank, not the head of the kingpin. See Figure 6.8.
- Release arm properly seated and safety latch/lock engaged.
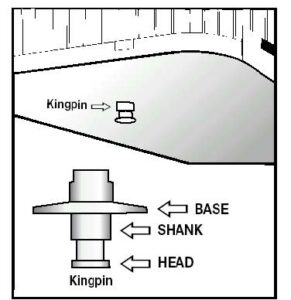
Figure 6.8
- Check fifth wheel (upper).
- Glide plate securely mounted to trailer frame.
- Kingpin not damaged.
- Air and electric lines to trailer.
- Electrical cord firmly plugged in and secured.
- Air-lines properly connected to glad hands, no air leaks, properly secured with enough slack for turns.
- All lines free from damage.
- Sliding fifth wheel.
- Slide not damaged or parts missing.
- Properly greased.
- All locking pins present and locked in place.
- If air-powered — no air leaks.
- Check that the fifth wheel is not so far forward that the tractor frame will hit the landing gear, or the cab will hit the trailer, during turns.
Landing Gear
- Fully raised, no missing parts, not bent or otherwise damaged.
- Crank handle in place and secured.
- If power operated, no air or hydraulic leaks.
6.5.2 - COMBINATION VEHICLE BRAKE CHECK
Do these checks in addition to Section 5.3: Inspecting Air Brake Systems.
The following section explains how to check air brakes on combination vehicles. Check the brakes on a double or triple trailer as you would any combination vehicle.
Check that Air Flows to All Trailers
Use the tractor parking brake and/or chock the wheels to hold the vehicle. Wait for the air pressure to reach normal, then push in the red "trailer air supply" knob. This will supply air to the emergency (supply) lines. Use the trailer handbrake to provide air to the service line. Go to the rear of the rig. Open the emergency line shut-off valve at the rear of the last trailer. You should hear air escaping, showing the entire system is charged. Close the emergency line valve. Open the service line valve to check that service pressure flows through all the trailers (this test assumes the trailer handbrake or the service brake pedal is on), then close the valve. If you do NOT hear air escaping from both lines, check that the shut-off valves on the trailer(s) and dolly(ies) are in the OPEN position. You MUST have air all the way to the back for all the brakes to work.
Test Tractor Protection Valve
Charge the trailer air-brake system. (That is, build up normal air pressure and push the "air supply" knob in.) Shut the engine off. Step on and off the brake pedal several times to reduce the air pressure in the tanks. The trailer air supply control (also called the tractor protection valve control) should pop out (or move from "normal" to "emergency") when the air pressure falls within the manufacturer-specified range. (Usually within the range of 20 to 45 psi.)
If the tractor protection valve isn't working properly, an air hose or trailer brake leak could drain all the air from the tractor. This would cause the emergency brakes to engage, potentially leading to a loss of control.
Test Trailer Emergency Brakes
Charge the trailer air brake system and check that the trailer rolls freely. Then stop and pull out the trailer air supply control (also called tractor protection valve control or trailer emergency valve), or place it in the "emergency" position. Pull gently on the trailer with the tractor to check that the trailer's emergency brakes are on.
Test Trailer Service Brakes
Check for normal air pressure, release the parking brakes, move the vehicle forward slowly, and apply trailer brakes with the hand control (trolley valve), if so equipped. You should feel the brakes come on. This tells you the trailer brakes are connected and working. (The trailer brakes should be tested with the hand valve but controlled in normal operation with the foot pedal, which applies air to the service brakes at all wheels.)
SUBSECTION 6.5 - TEST YOUR KNOWLEDGE
- Which shut-off valves should be open and which closed?
- How can you test that air flows to all trailers?
- How can you test the tractor protection valve?
- How can you test the trailer's emergency brakes?
- How can you test the trailer service brakes?
These questions may be on your test. If you can’t answer all of them, re-read subsection 6.5.