MOTORCYCLE SECTION 4: RIDE WITHIN YOUR ABILITIES
Reading this manual does not teach you the physical skills to control direction, speed, or balance. That’s something you can learn only through practice, preferably in a formal course of instruction like an MSF RiderCourse. But control begins with knowing your abilities and riding within them, along with knowing and obeying the rules of the road.
Basic Vehicle Control
BODY POSITION
To control a motorcycle well:
- Posture — Position yourself comfortably so you are able to operate all the controls and steer effectively. This helps you interact well with your motorcycle and respond quickly to hazards.
- Seat — Sit far enough forward so that arms are slightly bent when you hold the handgrips. Bending your arms lets you press on the handlebars without reaching too far.
- Hands — Hold the handgrips firmly to keep your grip over rough surfaces. Start with your right wrist flat. This will help you keep from accidentally using too much throttle. Also, adjust the handlebars so your hands are even with or below your elbows. This permits you to use the proper muscles for proper steering.
- Knees — Keep your knees against the gas tank to help you keep your balance as the motorcycle turns.
- Feet — Keep your feet firmly on the footrests to maintain balance. Don’t drag your feet. If your foot catches on something, you could be injured, and it could affect your control of the motorcycle. Keep your feet near the controls so you can get to them easily if needed. Also, don’t let your toes point downward — they may get caught between the road and the footrests.
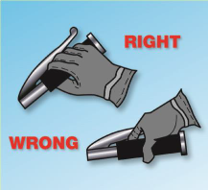
Handgrips
SHIFTING GEARS
There is more to shifting gears than simply getting the motorcycle to accelerate smoothly. Learning to use the gears when downshifting, turning, or starting on hills is equally important for safe motorcycle operation.
The gearshift lever is located in front of the left footrest and is operated by the left foot. To shift “up” to a higher gear, position your foot under the shift lever and lift and release. To downshift, press the shift lever down and release. The shift lever changes one gear each time it is lifted or pressed down. Whenever the lever is released, spring loading returns it to the center, where the mechanism resets for the next shift up or down. A typical gear pattern is 1-N2-3-4-5. The N is for neutral, which is selected by either a “half lift” from 1st gear or a “half press” from 2nd gear.
Most motorcycles have five gears, but some have four or six gears.
As your motorcycle increases speed, you will need to shift up to a higher gear. Shift up well before the engine RPM reaches its maximum recommended speed. As a general rule, shift up soon enough to avoid overrevving the engine, but not so soon that the engine lugs.
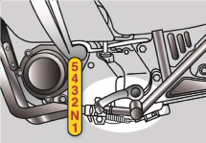
Shifting Gears
When Upshifting, Use a 3-Step Process:
- Roll off the throttle as you squeeze the clutch lever.
- Lift the shift lever firmly as far as it will go and release.
- Smoothly ease out the clutch lever and adjust the throttle.
You should shift down through the gears using the clutch lever as you slow or stop. You can also shift down when you need more power to accelerate.
Make certain you are riding slowly enough when you shift into a lower gear. If not, the motorcycle will lurch, and the rear wheel may skid. When riding downhill or shifting into first gear, you may need to use the brakes to slow sufficiently before downshifting safely.
When Downshifting, Use a 3-Step Process:
- Roll off the throttle as you squeeze the clutch lever.
- Press the shift lever down firmly and release.
- Ease out the clutch lever as you roll on the throttle. Rolling on the throttle slightly while smoothly easing out the clutch lever can help the engine come up to speed more quickly and make the downshift smoother. Shifting to a lower gear causes an effect similar to using the brakes. This is known as engine braking. To use engine braking, shift down one gear at a time and ease out the clutch lever through the friction zone between each downshift. Stay in the friction zone until the engine speed stabilizes. Then ease out the lever fully until ready for the next downshift. Usually, you shift gears one at a time, but it is possible to shift through more than one gear while the clutch lever is squeezed.
Remain in first gear when stopped so you can move out quickly if needed.
Work toward a smooth, even clutch lever release, especially when downshifting. It is best to change gears before entering a turn. However, sometimes shifting while in the turn is necessary. If so, remember to do so smoothly. A sudden change in power to the rear wheel can cause a skid.
BRAKING
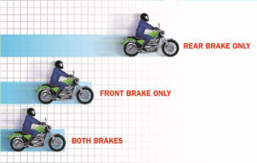
Improper braking remains a significant contributing factor in many motorcycle crashes. Most motorcycles have two brake controls: one for the front wheel and one for the rear wheel. Always use both brakes when slowing or stopping. The front brake is more powerful and can provide 70% or more of your total stopping power. The front brake is safe to use if you use it properly.
Maximum straight-line braking is accomplished by fully applying both front and rear brakes without locking either wheel. To do this:
- Squeeze the front brake smoothly, firmly, and with progressively more force. Do not grab the brake lever or use abrupt pressure.
- As the motorcycle’s weight transfers forward, more traction becomes available at the front wheel, so the front brake can be applied more firmly after braking begins.
- Keep your knees against the tank and your eyes up, looking well ahead. This helps you stop the motorcycle in a straight line.
- Apply light-to-lighter pressure to the rear brake pedal to prevent a rear wheel skid. As weight transfers forward, less traction is available at the rear.
Using both brakes for even “normal” stops will help you develop the proper skill of using them properly in an emergency. Squeeze the front brake and press down on the rear. Grabbing at the front brake or jamming down on the rear can cause the brakes to lock, resulting in control problems.
Braking in a Corner
Whenever a motorcycle is leaned over, the available traction for braking is reduced. The greater the lean angle, the greater the possibility of the tires losing traction.
To stop as quickly and as safely as possible in a curve, and depending on road and traffic conditions, try to get the motorcycle as perpendicular to the road as possible, then brake. If conditions do not allow, brake smoothly and gradually, but do not apply as much braking force as you would if the motorcycle were straight up. As you slow, you can reduce your lean angle, and as more traction becomes available for braking, you can apply the brakes more firmly, so that by the time the motorcycle is stopped, it is straight up and the handlebars are squared. Doing this well takes practice.
Linked and Integrated Braking Systems
Some motorcycles have linked braking, which connects the front and rear brakes and applies braking pressure to both brakes when either the front lever or rear pedal is applied. An integrated braking system is a variation of the linked system in which partial front braking is applied whenever the rear brake is activated. Consult the owner’s manual for a detailed explanation of the operation and effective use of these systems.
Anti-Lock Braking Systems (ABS)
ABS is designed to prevent wheel lock-up and avoid skids when stopping in panic situations. ABS operates when too much pressure is applied to either the front or rear brake control. If electronic sensors detect a possible wheel lock, brake pressure is released, then reapplied to maintain maximum braking effectiveness if the brake controls remain applied.
ABS can release and reapply pressure more than 15 times per second.
TURNING
Approach turns and curves with caution. Riders often try to take curves or turns too fast. When they can’t hold the turn, they end up crossing into another lane of traffic or going off the road. Or, they overreact and brake too hard, causing a skid and loss of control.
The following four steps will help you learn to turn effectively. Note that in actual use, these steps may overlap:
- Slow — Reduce speed before the turn by closing the throttle and, if necessary, applying both brakes.
- Look — Look through the turn to where you want to turn, just your head, not your shoulders, and keep your eyes level with the horizon.
- Press — To turn, the motorcycle must lean. To lean the motorcycle, press on the handgrip in the direction of the turn. Press left handgrip — lean left — go left. Press right-hand grip — lean right — go right. The higher the speed in a turn, or the sharper the turn, the greater the lean angle needs to be.
- Roll — Roll on the throttle to maintain or slightly increase speed. This helps stabilize the motorcycle.
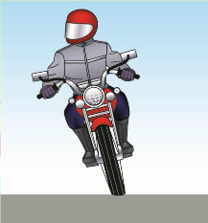
Normal Turns
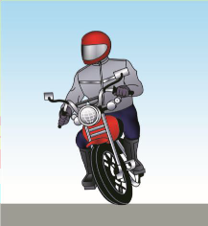
Slow, Tight Turns
Keeping Your Distance
It is good to have a “cushion of space” separating yourself from other vehicles on the roadway. This will provide you with a clear view of traffic situations, so that if someone else makes a mistake, you will have:
- More time to respond.
- More space to maneuver, including an escape path if necessary.
LANE POSITIONS
Successful motorcyclists know that they are safer when clearly seen by others. In some ways, the size of the motorcycle can work to your advantage. Each traffic lane gives a motorcycle three paths of travel, as indicated in the illustration.
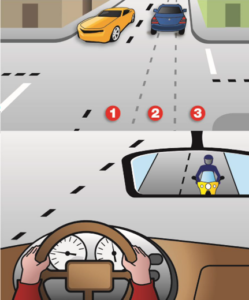
Lane Choice
Your lane choice should help you:
- Increase your ability to see and be seen.
- Avoid others’ blind spots.
- Avoid surface hazards.
- Communicate your intentions.
- Avoid windblast from other vehicles.
- Provide an escape path.
- Set up for turns.
Many motorcyclists consider the left third of the lane – the left tire track of automobiles – to be their default lane position. But consider varying your lane position as conditions warrant, keeping in mind that no portion of the lane needs to be avoided — including the center.
You should position yourself in the portion of the lane where you are most likely to be seen, and you can maintain a space cushion around you. Change position as traffic situations change. Ride in path 2 or 3 if vehicles and other potential problems are on your left only. Remain in path 1 or 2 if hazards are on your right only. If vehicles are being operated on both sides of you, the center of the lane (path 2) is usually your best option.
Remember, the center third of the lane is where debris and oil drippings from cars collect, as well as where hazards such as surface covers are located. Unless the road is wet, the typical center strip permits adequate traction. You can operate to the left or right of the grease strip and still be within the center third of the traffic lane. Avoid riding on large oil and grease buildups, which are usually found at busy intersections or toll booths.
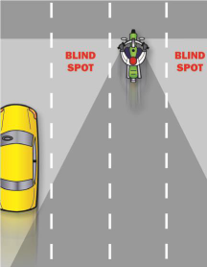
Experienced riders rely on their own strategies and judgment. One absolute, however, is to avoid riding in another vehicle’s blind spot.
FOLLOWING ANOTHER VEHICLE
“Following too closely” is a frequent factor in crashes involving motorcyclists. In traffic, motorcycles need as much distance to stop as cars. Normally, a minimum of two seconds' distance should be maintained when following a vehicle.
To gauge your following distance:
- Pick out a marker, such as a pavement marking or lamppost, on or near the road ahead.
- When the rear of the vehicle ahead passes the marker, count off the seconds: "one-thousand-one, one-thousand-two."
- If you reach the marker before you reach “two,” you are following too closely.
A two-second following distance leaves little room to stop or swerve if the driver ahead stops suddenly. It also permits a better view of potholes and other hazards on the road. A larger cushion of space is needed if your motorcycle takes longer than usual to stop. If the pavement is slippery, if you cannot see through the vehicle ahead, or if traffic is heavy and someone may squeeze in front of you, open up a three- second or more following distance.
Keep well behind the vehicle ahead, even when you are stopped. This will make it easier to get out of the way if someone bears down on you from behind. It will also give you a cushion of space if the vehicle ahead starts backing up for some reason.
When riding behind a car, ride where the driver can see you in the inside rearview mirror. Riding in the center portion of the lane should put you in view.
Riding at the far side of a lane may permit a driver to see you in a side-view mirror. But remember that most drivers don’t look at their sideview mirrors nearly as often as they check the inside mirror. If traffic conditions allow, the center of the lane is usually the best place for you to be seen by drivers ahead and to prevent others from encroaching on your space.
Being Followed
Speeding up to avoid someone following too closely can result in that person tailgating you at a higher speed.
A better way to handle tailgaters is to get them in front of you. When someone is following too closely, try to let them pass. If you can’t do this, slow down and open up extra space ahead to allow room for both you and the tailgater to stop. This will also encourage them to pass. If they don’t pass, you will have given yourself and the tailgater more time and space to react in case an emergency develops ahead.
You can also turn off the roadway and re-enter later, or use a parking area to do so.
PASSING
- Ride in the left portion of the lane at a safe following distance to increase your line of sight and make you more visible. Signal and check for oncoming traffic. Use your mirrors and turn your head to check your blind spot.
- When safe, move into the left lane and accelerate. Select a lane position that doesn't crowd the car and provides space to avoid hazards in your lane.
- Don’t linger in the blind spot.
- Signal again, and complete mirror and head checks before returning to your original lane, and then cancel the signal. Remember, passes must be completed within posted speed limits, and only where permitted. Know your signs and roadway markings!
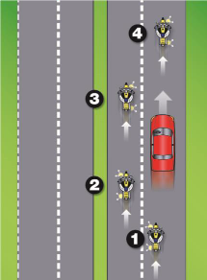
Motorcycle Passing Vehicle
Being Passed
When you are being passed from behind, stay in the center portion of your lane. Riding close to the passing vehicle could put you in a hazardous situation.
Avoid being hit by considering:
- The other vehicle — A slight mistake by you or the passing driver could cause a sideswipe.
- Extended mirrors — Some drivers forget that their mirrors hang out farther than their fenders.
- Objects thrown from windows — Even if the driver knows you're there, a passenger may not see you and might toss something at you or the road ahead of you.
- Blasts of wind from larger vehicles — They can affect your control. You have more room for error if you are in the farther portion when hit by this blast than if you are closer to their lane.
LANE SHARING
Cars and motorcycles need a full lane to operate safely. Lane sharing is usually prohibited.
Riding between rows of stopped or moving cars in the same lane can leave you vulnerable to the unexpected. A hand could come out of a window; a door could open; a car could turn suddenly. Discourage lane sharing by others. Keep a center-portion position whenever drivers might be tempted to squeeze by you. Drivers are most tempted to do this:
- In heavy, bumper-to-bumper traffic.
- When they want to pass you.
- When you are preparing to turn at an intersection.
- When you are moving into an exit lane or leaving a highway.
Merging Vehicles
Drivers on an entrance ramp may not see you on the highway. Give them plenty of room. Change lanes if one is open. If there is no room for a lane change, adjust speed to open up space for the merging vehicle.
Vehicles Alongside
Do not ride next to cars or trucks in other lanes unless you have to. You might be in the blind spot, and a vehicle could switch into your lane without warning. Vehicles in the next lane also block your escape if you come upon danger in your own lane. Speed up or drop back to find a place clear of traffic on both sides.
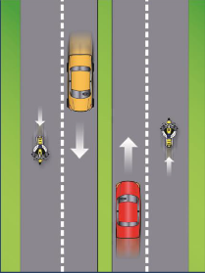
Lane Traveling
SEE
Good, experienced riders are always aware of what is going on around them. They reduce their risk by using MSF’s three-step SEE strategy:
- Search
- Evaluate
- Execute
SEE will help you assess what is going on in traffic so you can plan and implement the safest course of action as traffic situations change. Let’s look at each of these steps.
SEARCH
How assertively you search, and how much time and space you have, can eliminate or minimize risk. As you search, focus on identifying potential escape routes, especially at or near intersections, shopping areas, and school and construction zones.
One way to search is to use your “Rider Radar” to aggressively scan the environment ahead of you, to the sides, and behind you to avoid potential hazards even before they arise. There are three “lead times” to consider. First, have at least a 2-second following distance. Scanning your 4-second urgent path can give you time for a quick response if something goes wrong.
Anything that is within 4 seconds of your path is considered immediate because 4 seconds can provide enough time and space to swerve and/or brake for fixed hazards or for someone or something entering your path.
Finally, search for hazards that are further out, looking ahead to an area it would take about 12 seconds to reach. This provides time to prepare for a situation before it becomes urgent.
Using the SEE strategy will help you to Search for a variety of factors, such as:
- Oncoming traffic that may turn left in front of you.
- Traffic coming from the left and from the right.
- Traffic approaching from behind.
- Hazardous road conditions that require you to be alert, especially in areas with limited visibility. Visually “busy” surroundings could make you and your motorcycle harder to see.
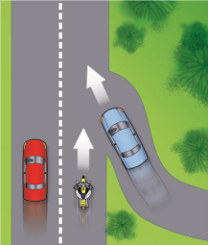
Highway Merging
EVALUATE
Evaluate means to think about how hazards can interact to create risks for you. Anticipate potential problems and have a plan to reduce risks:
- Road and surface characteristics such as potholes, guardrails, bridges, telephone poles, and trees may influence your riding strategy.
- Traffic control devices, including traffic signals, warning signs, and pavement markings, which will require you to carefully evaluate circumstances ahead.
- Vehicles and other traffic that may move into your path and increase the likelihood of a crash. Consider your time and space requirements to maintain a margin of safety, and give yourself time to react if an emergency arises.
- Escape paths need to be available, and these can be in front or to the sides.
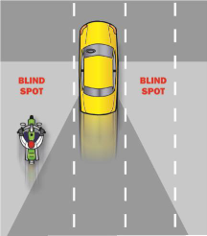
Vehicle Blindspot
EXECUTE
Finally, Execute your decision with smoothness and precision. To create more space and minimize harm from any hazard, take action by:
- Communicating your presence with lights and/or horn.
- Adjusting your speed by accelerating, stopping, or slowing.
- Adjusting your position and/or direction by swerving or changing lanes.
Adjust the speed to permit two hazards to separate. Then deal with them one at a time as single hazards. Decision-making becomes more complex when there are three or more hazards. Evaluate the consequences of each and give equal distance to the hazards.
In potential high-risk areas, such as intersections, shopping areas, and school and construction zones, cover the clutch and both brakes to reduce the time you need to react.
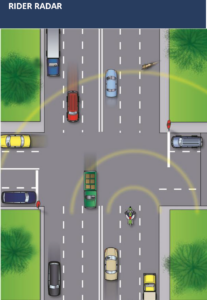
Rider Radar
Intersections
The greatest potential for conflict between you and other traffic is at intersections.
Apply the old adage “one step at a time” to handle multiple hazards. Intersection can be in the middle of an urban area or at a driveway on a residential street — anywhere traffic may cross your path of travel. Over one-half of motorcycle/car crashes are caused by drivers violating a rider’s right-of-way. Cars turning left in front of you, including those turning left from the lane on your right, and cars on side streets pulling into your lane are the biggest dangers. Your use of SEE at intersections for added time and space is critical.
There are no guarantees that others will see you. Never count on “eye contact.” Too often, a driver looks right at a motorcyclist and still fails to “see” him or her. The only eyes that you can count on are your own. If a car can enter your path, assume that it will. Good riders are always “looking for trouble” — not to get into it, but to stay out of it.
Decrease your risk by being seen at intersections. Ride with your headlight on and be in a lane position that provides the best view of oncoming traffic. Provide a space cushion around the motorcycle that gives you an escape path. When approaching an intersection where a vehicle driver is preparing to cross your path, slow down and select a lane position to increase your visibility to that driver. Cover the clutch lever and both brakes to reduce reaction time. As you enter the intersection, move away from the vehicle. Do not change speed or position radically, as drivers might think you are preparing to turn. Be prepared to brake hard and hold your position if an oncoming vehicle turns in front of you, especially if there is other traffic around you.
Blind Intersections
If you approach a blind intersection, move to the portion of the lane that will bring you into another driver’s field of the oncoming lane of traffic is signaling for a left turn, whether at an intersection or not.
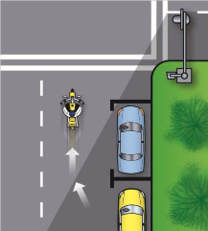
Motorcycle Passing Parked Vehicle
In this picture, the rider has moved to the left portion of the lane — away from the parked car — so the driver on the cross street can see him earlier.
Remember, the key is to see as much as possible and remain visible to others while protecting your space.
If you have a stop sign or stop line, stop there first. Then edge forward and stop again, just short of where the cross-traffic lane meets your lane. From that position, lean your body forward and look around buildings, parked cars, or bushes to see if anything is coming. Just make sure your front wheel stays out of the cross lane of travel while you’re looking.
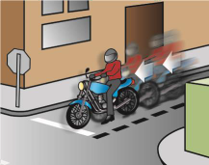
Stop Signs
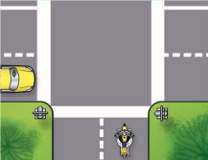
Small Intersection
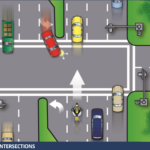
Large Intersection
Passing Parked Cars
When passing parked cars, stay toward the left of your lane. You can avoid problems caused by doors opening, drivers getting out of cars, or people stepping from between cars. If oncoming traffic is present, it is usually best to remain in the center-lane position to maximize your space cushion on both sides.
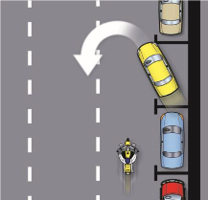
Parked Vehicle Moving into Traffic
A bigger problem can occur if the driver pulls away from the curb without checking for traffic behind. Even if he does look, he may fail to see you.
In either event, the driver might cut into your path. Slow down or change lanes to make room for someone who might cut in.
Cars making a sudden U-turn are dangerous. They may cut you off entirely, blocking the entire roadway and leaving you with nowhere to go. Since you can’t tell what a driver will do, slow down and get the driver’s attention. Use your horn and continue with caution.
Parking at the Roadside
If parking in a parallel parking space next to a curb, position the motorcycle at an angle with the rear wheel to the curb. (NOTE: Some cities have ordinances that require motorcycles to park parallel to the curb.)
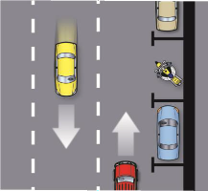
Motorcycle Parking
Increasing Conspicuity
In crashes with motorcyclists, drivers often say that they never saw the motorcycle. From ahead or behind, a motorcycle’s outline is much smaller than a car’s. Also, it’s difficult to see something you are not looking for, and most drivers are not looking for motorcycles.
A good strategy to use is to pretend you're invisible. If you assume other motorists can't see you, you will tend to ride in a hyper-aware mindset and notice more details in your surroundings.
Even if a driver does see you coming, you aren’t necessarily safe. Smaller vehicles appear farther away than they actually are. It is common for drivers to pull out in front of motorcyclists, thinking they have plenty of time. Too often, they are wrong.
However, you can do many things to make it easier for others to recognize you and your motorcycle.
CLOTHING
Most crashes occur during daylight hours. Wear bright-colored clothing to increase your chances of being seen. Remember, your body is half of the visible surface area of the rider/ motorcycle unit.
Bright orange, red, yellow, or green jackets/vests are your best bets for being seen. Your helmet can do more than protect you in a crash. Brightly colored helmets can also help others see you.
Any bright color is better than drab or dark colors. Reflective, bright-colored clothing (helmet and jacket/vest) is best.
Reflective material on a vest and the sides of the helmet will help drivers approaching from the side spot you. Reflective material can also be a big help for drivers both ahead and behind.
HEADLIGHT
A good way to help others see your motorcycle is to have the headlight on at all times. Studies show that, during the day, a motorcycle with its light on is twice as likely to be noticed. Use low beam at night and in fog.
SIGNALS
The signals on a motorcycle are similar to those on a car. They tell others what you plan to do.
However, due to a rider’s added vulnerability, signals are even more important. Use them anytime you plan to change lanes or turn. Use them even when you think no one else is around. Your signal lights make you easier to spot. That’s why it’s a good idea to use your turn signals even when what you plan to do is obvious.
When you enter a freeway, drivers behind you are more likely to see your signal blinking and make room for you.
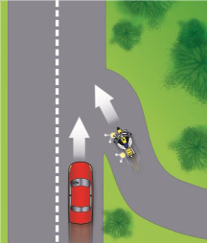
Merging Motorcycle
Turning your signal light on before each turn reduces confusion and frustration for the traffic around you. Once you turn, make sure your signal is off, or a driver may pull directly into your path, thinking you plan to turn again. Use your signals at every turn so drivers can react accordingly. Don’t make them guess what you intend to do.
BRAKE LIGHT
Your motorcycle’s brake light is usually not as noticeable as the brake lights on a car. If the situation will permit, help others notice you by flashing your brake light before you slow down. It is especially important to flash your brake light before:
- You slow more quickly than others might expect (turning off a high-speed highway.)
- You slow where others may not expect it (in the middle of a block or at an alley.)
- You are stopped at an intersection with traffic approaching from behind.
If you are being closely followed, it’s a good idea to flash your brake lights before you slow down. The tailgater may be watching you and not see something ahead that will make you slow down. This will hopefully discourage them from tailgating and warn them of hazards ahead that they may not see.
USING YOUR MIRRORS
While it’s most important to keep track of what’s happening ahead, you can’t afford to ignore situations behind.
Traffic conditions can change quickly. Knowing what’s going on behind is essential for you to make a safe decision about how to handle trouble ahead.
Frequent mirror checks should be part of your normal searching routine. Make a special point of using your mirrors:
- When you are stopped at an intersection. Watch cars coming up from behind. If the drivers aren’t paying attention, they could be on top of you before they see you.
- Before you change lanes, make sure no one is about to pass you.
- Before you slow down, the driver behind may not expect you to slow down, or may be unsure about where you will slow. For example, you signal a turn, and the driver thinks you plan to turn at a distant intersection, rather than at a nearer driveway.
Most motorcycles have rounded (convex) mirrors. These provide a wider view of the road behind than flat mirrors do. They also make cars seem farther away than they actually are. If you are not used to convex mirrors, get familiar with them. (While you are stopped, pick out a parked car in your mirror. Form a mental image of how far away it is. Then, turn around and look at it to see how good your estimate was.) Practice with your mirrors until you become a good judge of distance. Even then, allow extra distance before you change lanes.
HEAD CHECKS
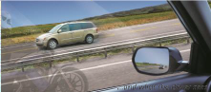
Checking your mirrors is not enough. Motorcycles have “blind spots” like cars. Before you change lanes, turn your head and look to the side for other vehicles.
On a road with several lanes, check the far lane and the one next to you. A driver in the distant lane may head for the same space you plan to take.
Frequent head checks should also be part of your normal scanning routine. Only by knowing what is happening all around you are you fully prepared to deal with it.
HORN
Be ready to use your horn to get someone’s attention quickly.
It is a good idea to give a quick beep before passing anyone who may move into your lane.
Here are some situations:
- A driver in the lane next to you is driving too closely to the vehicle ahead and may want to pass.
- A parked car has someone in the driver’s seat.
- Someone is in the street, riding a bicycle or walking.
In an emergency, sound your horn loudly and for a long time. Be ready to stop or swerve away from the danger.
Keep in mind that a motorcycle’s horn isn’t as loud as a car’s — therefore, use it, but don’t rely on it. Other strategies, such as having time and space to maneuver, are appropriate alongside the horn.
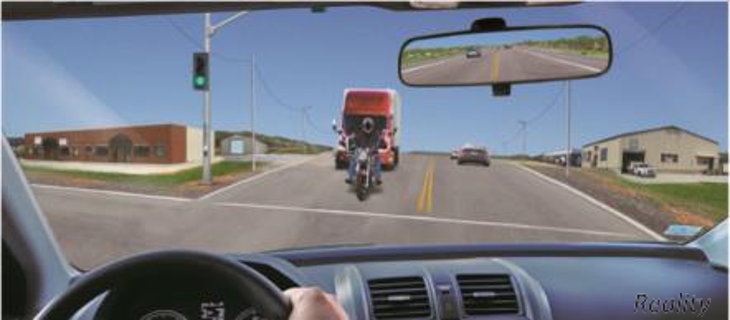
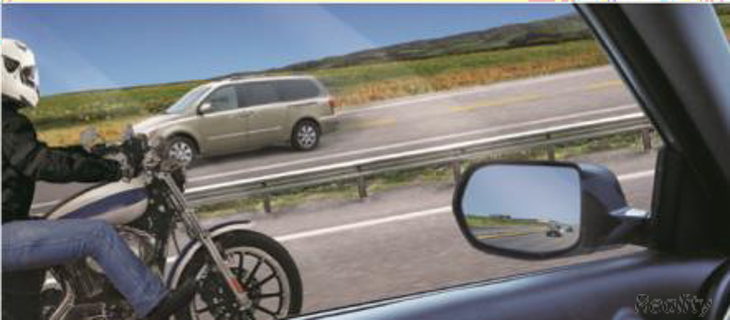
RIDING AT NIGHT
At night, it is harder for you to see and be seen. Picking your headlight or taillight out of the car lights around you is not easy for other drivers. To compensate, you should:
- Reduce your speed — Ride slower than you would during the day — particularly on roads you don’t know well. This will increase your chances of avoiding a hazard.
- Increase distance — Distances are harder to judge at night. Your eyes rely on a three-second following distance or more. And allow more distance to pass and be passed.
- Use the car ahead — The headlights of the car ahead can give you a better view of the road than even your high beam can. Taillights bouncing up and down can alert you to bumps or rough pavement.
- Use your high beam — Get all the light you can. Use your high beam whenever you are not following or meeting a car.
- Be visible — Wear reflective materials when riding at night.
- Do not override your headlight — Do not let your total stopping distance exceed the distance your light beam illuminates. Slow down so you can stop within the distance you can see.
- Be flexible about lane position — Change to the portion of the lane that is best to help you see, be seen, and maintain an adequate space cushion.
Motorcycle Blind Spot
Crash Avoidance
No matter how careful you are, there will be times when you find yourself in a tight spot. Your chances of getting out safely depend on your ability to take action quickly and properly. Often, a crash occurs because a rider is not prepared or skilled in crash-avoidance maneuvers.
Know when and how to stop or swerve, two skills critical in avoiding a crash. It is not always desirable or possible to stop quickly to avoid an obstacle. Riders must also be able to swerve around an obstacle. Determining which skill is necessary for the situation is important as well.
Studies show that most crash-involved riders:
- Under brake the front tire and over brake the rear.
- Did not separate braking from swerving, or did not choose swerving when it was appropriate.
The following information offers some good advice.
QUICK STOPS
To stop quickly, apply both brakes at the same time. Don’t be shy about using the front brake, but don’t “grab” it either. Squeeze the brake lever firmly and progressively. If the front wheel locks, release the front brake lever immediately, then reapply it firmly. At the same time, press down on the rear brake. If you accidentally lock the rear brake on a good traction surface, you can keep it locked until you have completely stopped; even with a locked rear wheel, you can control the motorcycle if it is upright and going in a straight line.
Stopping Quickly in a Curve
Using both brakes in a turn is possible, although it should be done very carefully. When leaning the motorcycle, some of the traction is used for cornering. Less traction is available for stopping. A skid can occur if you apply the brakes too hard. Also, using the front brake incorrectly on a slippery surface may be hazardous. Use caution and squeeze the brake lever; never grab.
If you must stop quickly while in a curve, first straighten and square the handlebars, then stop. If you find yourself in a situation where straightening first is not possible, such as when there is a danger of running off the road in a left-hand curve or when facing oncoming traffic in a right-hand curve, apply the brakes smoothly and gradually. As you slow, you can reduce your lean angle and apply more brake pressure until the motorcycle is straight, at which point you can apply maximum brake pressure. Always straighten the handlebars in the last few feet of stopping to maintain your balance and remain upright.
Stopping Distance
SWERVING OR TURNING QUICKLY
Sometimes you may not have enough room to stop, even if you use both brakes properly. You may encounter an unexpected object in your path. Or the car ahead might squeal to a stop. The only way to avoid a crash may be to turn quickly or swerve around it.
A swerve is a sudden change in direction. Apply a small amount of hand pressure to the handle grip located on the side of your intended direction of escape. This will cause the motorcycle to lean quickly. The sharper the desired turn(s), the more the motorcycle must lean.
Keep your body upright and allow the motorcycle to lean in the direction of the turn while keeping your knees against the tank and your feet solidly on the footrests. Let the motorcycle move underneath you. Make your escape path the target of your vision. Press on the opposite handle grip once you’re clear to return you to your original direction of travel.
If the situation allows, separate braking from swerving. Brake before or after – never while making an aggressive swerve.
MAXIMUM STRAIGHT-LINE BACKING
Maximum straight-line braking is accomplished by fully applying front and rear brakes without locking either wheel. Keep your body centered over the motorcycle and look well ahead, not down. This will help you keep the motorcycle as straight as possible, minimizing lean angle and the likelihood of the tires losing traction.
SKIDS
Front-Wheel Skids
If the front wheel locks, release the front brake lever immediately and reapply with less pressure. Reapply the brake smoothly. Front wheel skids result in immediate loss of steering control and balance. Failure to fully release the brake lever immediately will result in a crash.
Rear-Wheel Skids
A skidding rear tire is a dangerous condition that can result in a violent crash. Too much rear brake pressure causes rear-wheel lockup. As soon as the rear wheel locks, your ability to change direction is lost. To regain control, the brake must be released. However, if the rear wheel is out of alignment with the front, there is a risk of a high-side crash. This occurs when the wheels are out of alignment, and a locked rear wheel is released. The motorcycle can abruptly snap upright, throwing the rider into the air ahead of the motorcycle’s path. Even slight misalignment can result in a high-side crash.
CURVES
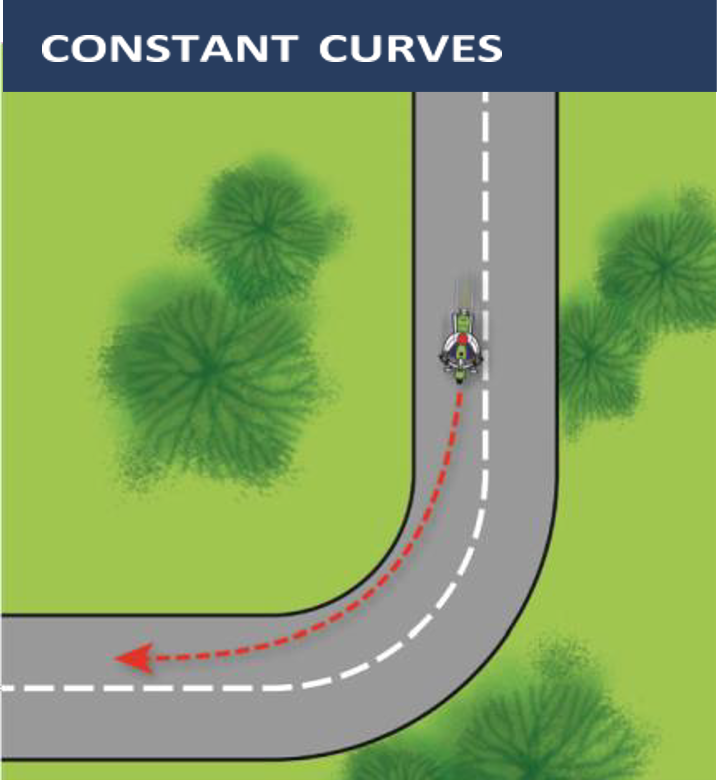
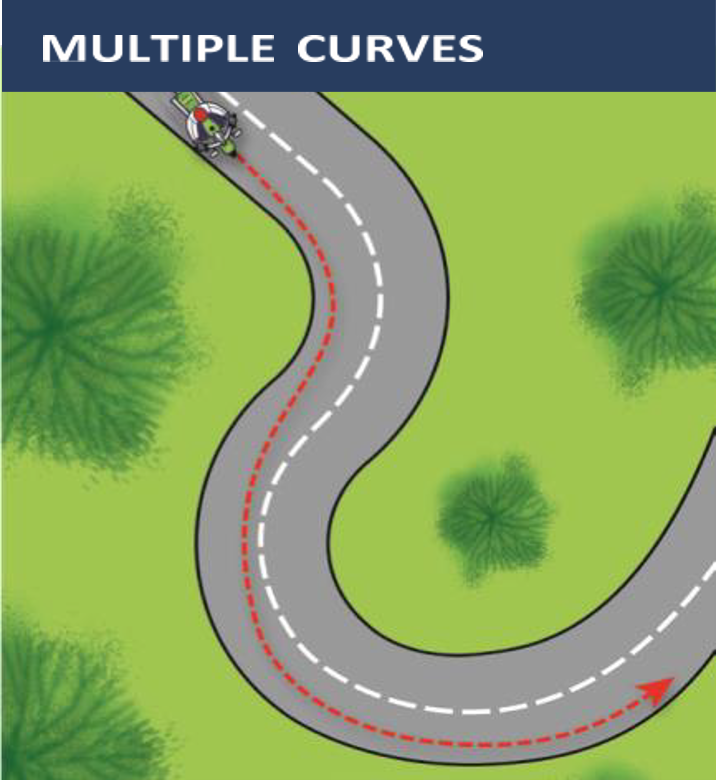
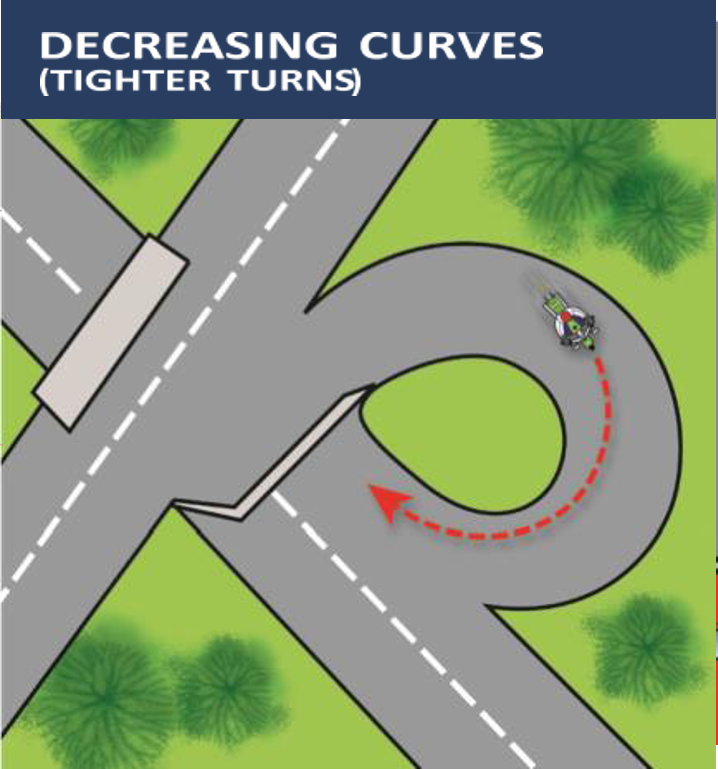
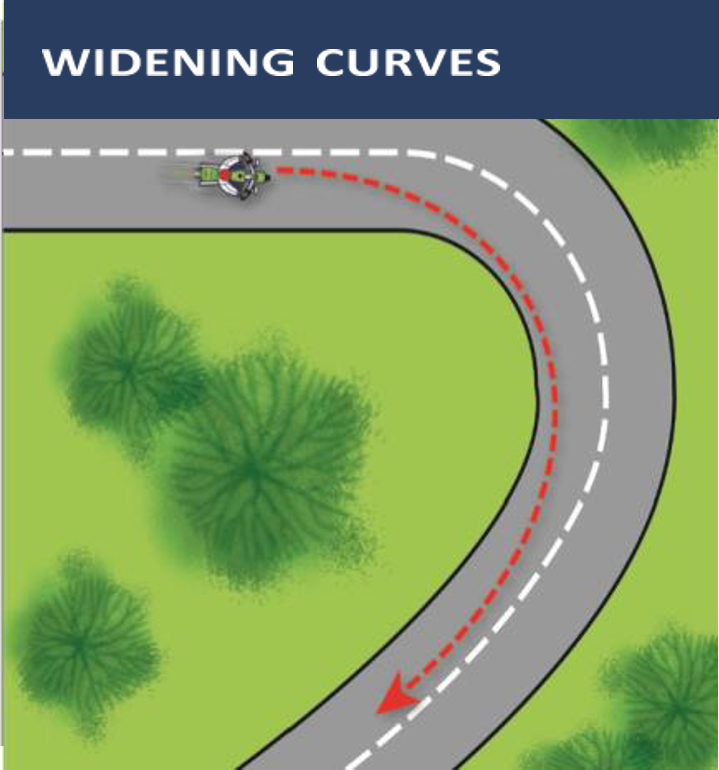
A primary cause of single-vehicle crashes is motorcyclists running wide in a curve or turn. Every curve is different. Be alert to whether a curve remains constant, gradually widens, gets tighter, or involves multiple turns. Ride within your skill level and posted speed limits.
A good choice is to move to the center of your lane before entering a curve — and stay there until you exit. This permits you to spot approaching traffic as soon as possible. You can also adjust for traffic “crowding” the center line, or debris blocking part of your lane.
Your best path may not always follow the curve of the road. Change lane position depending on traffic, road conditions, and the curve of the road.
Handling Dangerous Surfaces
Your chance of falling or being involved in a crash increases whenever you ride across:
- Uneven surfaces or obstacles.
- Slippery surfaces.
- Railroad tracks.
- Grooves and gratings.
UNEVEN SURFACES AND OBSTACLES
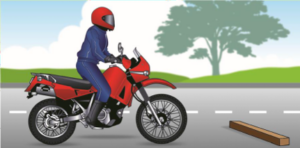
Watch for uneven surfaces such as bumps, broken pavement, potholes, or small pieces of highway trash.
Try to avoid obstacles by slowing down or going around them. If you must go over a smaller obstacle, approach it at as close to a 90˚ angle as possible. Look where you want to go to control your path of travel. If you have to ride over the obstacle, you should:
- Slow down as much as possible before contact.
- Make sure the motorcycle is straight.
- Rise slightly off the seat with your weight on the footrests to absorb the shock with your knees and elbows.
- Just before contact, quickly roll on the throttle slightly to lighten the front end and then roll off.
If you ride over an object on the street, pull off the road and check your tires and rims for damage before riding any farther.
Slippery Surfaces
Motorcycles handle better on surfaces that provide good traction. Surfaces that provide poor traction include:
- Wet pavement, particularly just after it starts to rain and before surface oil washes to the side of the road.
- Gravel roads, or where sand and gravel collect.
- Mud, leaves, snow, and ice.
- Lane markings (painted lines), steel plates, and surface covers, especially when wet.
To ride safely on slippery surfaces:
- Reduce speed — Slow down before you get to a slippery surface to lessen your chances of skidding. Your motorcycle needs more distance to stop. And it is particularly important to reduce speed before entering wet curves.
- Avoid sudden moves — Any sudden change in speed or direction can cause a skid. Be as smooth as possible if you have to speed up, shift gears, turn, or brake.
- Use both brakes — The front brake is still effective, even on a slippery surface. Squeeze the brake lever gradually to avoid locking the front wheel. Remember, gentle pressure on the brakes.
- The center of a lane can be hazardous when wet. When it starts to rain, ride in the tire tracks left by vehicles. Often, the left tire track will be the best position, depending on traffic and other roadway conditions.
- Watch for oil spots when you put your foot down to stop. You may slip and fall.
- Dirt and gravel collect along the sides of the road — especially on curves and ramps leading to and from highways. Be aware of what’s on the edge of the road, particularly when making sharp turns and getting on or off freeways at high speeds.
- Rain dries and snow melts faster on some sections of a road than on others. Patches of ice tend to develop in low or shaded areas and on bridges and overpasses. Wet surfaces or wet leaves are just as slippery. Ride on the least slippery portion of the lane and reduce speed.
Obstacles
Cautious riders avoid roads covered with ice or snow. If you can’t, keep your motorcycle straight up and proceed as slowly as possible. If you must travel at a walking pace, consider letting your feet skim along the surface. Be sure to keep off the brakes. If possible, squeeze the clutch lever and coast. Attempting this maneuver at anything other than the slowest of speeds could prove hazardous.
Obstacles
RAILROAD TRACKS, TROLLEY TRACKS, AND PAVEMENT SEAMS
Usually, it is safer to ride straight within your lane to cross tracks. Turning to take tracks at a 90˚ angle can be more dangerous — the direction may put you into another lane of traffic.
For track and road seams that run parallel to your path, move far enough away from tracks, ruts, or pavement seams to cross at an angle of at least 45˚. Then, make a deliberate turn so you’re not thrown off balance.
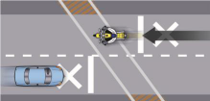
Crosstracks - Correct
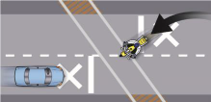
Crosstracks - Incorrect
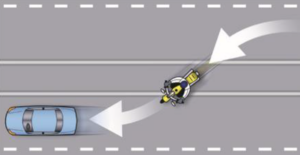
Parallel Tracks - Correct
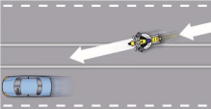
Parallel Tracks - Incorrect
GROOVES AND GRATINGS
Riding over rain grooves or bridge gratings may cause a motorcycle to weave. The uneasy, wandering feeling is generally not hazardous. Relax, maintain a steady speed, and ride straight across.
Crossing at an angle forces riders to zigzag to stay in the lane. The zigzag is far more hazardous than the wandering feeling.
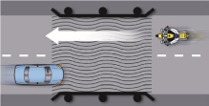
Grate Crossing - Correct
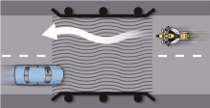
Grate Crossing - Incorrect
Mechanical Problems
You can find yourself in an emergency the moment something goes wrong with your motorcycle. In dealing with any mechanical problem, take into account the road and traffic conditions. Here are some guidelines that can help you handle mechanical problems safely.
TIRE FAILURE
You will seldom hear a tire go flat. If the motorcycle starts handling differently, it may be a tire failure.
If the front tire goes flat, the steering will feel "heavy." A flat front tire is particularly hazardous because it affects your steering. You have to steer well to keep your balance.
If the rear tire goes flat, the back of the motorcycle may jerk or sway from side to side.
If either tire goes flat while riding:
- Hold handgrips firmly, ease off the throttle, and keep a straight course.
- If braking is required gradually, apply the brake of the tire that isn't flat, if you are sure which one it is.
- When the motorcycle slows, edge to the side of the road, squeeze the clutch, and stop.
STUCK THROTTLE
If the situation allows, twist the throttle back and forth several times. If the throttle cable is stuck, this may free it. If the throttle stays stuck, immediately operate the engine cut-off switch and squeeze the clutch lever at the same time. This will remove power from the rear wheel, though engine sound may not immediately decline. Move to a safe area and stop.
Check the throttle cable carefully to find the source of the trouble. Make certain the throttle works freely before you start to ride again.
WOBBLE
A “wobble” occurs when the front wheel and handlebars suddenly start to shake from side to side at any speed. Most wobbles can be traced to improper loading, unsuitable accessories, or incorrect tire pressure. If you are carrying a heavy load, lighten it or reposition it. Center the weight lower and farther forward on the motorcycle. Make sure tire pressure, spring pre-load, air shocks, and dampers are at the settings recommended for the weight you are carrying. Make sure windshields and fairings are mounted properly.
Check for poorly adjusted steering; worn steering parts; a front wheel that is bent, misaligned, or out of balance; loose wheel bearings or spokes; and worn swingarm bearings. If none of these is determined to be the cause, have the motorcycle checked out thoroughly by a qualified professional.
Trying to “accelerate out of a wobble” will only make the motorcycle more unstable. Instead:
- Grip the handlebars firmly, but don’t fight the wobble.
- Close the throttle gradually to slow down. Do not apply the brakes; braking could make the wobble worse.
- Move your weight as far forward and down as possible.
- Pull off the road as soon as you can to fix the problem.
DRIVE TRAIN PROBLEMS
The drive train for a motorcycle uses either a chain, a belt, or a drive shaft to transfer power from the engine to the rear wheel. Routine inspection, adjustment, and maintenance makes failure a rare occurrence. A chain or belt that slips or breaks while you’re riding could lock the rear wheel and cause your motorcycle to skid.
If the chain or belt breaks, you’ll notice an instant loss of power to the rear wheel. Close the throttle and brake to a stop in a safe area.
On a motorcycle with a drive shaft, loss of oil in the rear differential can cause the rear wheel to lock, and you may not be able to prevent a skid.
ENGINE SEIZURE
When the engine “locks” or “freezes,” it is usually low on oil. The engine’s moving parts can’t mesh smoothly, and it overheats. The first sign may be a loss of engine power or a change in the engine’s sound. Squeeze the clutch lever to disengage the engine from the rear wheel. Pull off the road and stop. Check the oil. If needed, oil should be added as soon as possible, or the engine will seize. When this happens, the effect is the same as a locked rear wheel. Let the engine cool before restarting.
Animals
Naturally, you should do everything you safely can to avoid hitting an animal. If you are in traffic, however, remain in your lane. Hitting something small is less dangerous to you than hitting something big — like a car.
Motorcycles seem to attract dogs. If you are being chased, downshift and approach the animal slowly. As you approach it, accelerate and leave the animal behind. Don’t kick at the animal. Keep control of your motorcycle and look where you want to go.
For larger animals (deer, elk, cattle), brake, and prepare to stop — they are unpredictable.
Flying Objects
From time to time, riders are struck by insects, cigarettes thrown from cars, or pebbles kicked up by the tires of the vehicle ahead. If you are wearing face protection, it might smear or crack, making it difficult to see. Without face protection, an object could hit you in the eye, face, or mouth. Whatever happens, keep your eyes on the road and your hands on the handlebars. When safe, pull off the road and repair the damage.
Getting Off The Road
If you need to leave the road to check the motorcycle (or just to rest), be sure to:
- Check the roadside — Make sure the surface of the roadside is firm enough to ride on. If it is soft grass, loose sand, or if you’re just not sure about it, slow way down before you turn onto it.
- Signal — Drivers behind might not expect you to slow down. Give a clear signal that you will be slowing down and changing direction. Check your mirror and make a head check before you take any action.
- Pull off the road — Get as far off the road as you It can be very hard to spot a motorcycle by the side of the road. You don’t want someone else pulling off at the same place you are.
- Park carefully — Loose and sloped shoulders can make setting the side or center stand difficult.
Carrying Passengers and Cargo
The extra weight of a passenger or cargo will affect the way your motorcycle handles, requiring extra practice, preparation, and caution. For this reason, only experienced riders should attempt to carry passengers or large loads. Before taking a passenger or a heavy load on the street, prepare yourself and your motorcycle for safe operation in traffic.
PREPARING YOUR MOTORCYCLE
- Tire pressure – Check the air pressure of both tires. Refer to the owner’s manual or the label affixed to the motorcycle for the correct inflation specifications. Though most of the added weight will typically be on the rear wheel, don’t forget to also check the pressure on the front tire. Correct inflation pressures will maintain maximum stability, steering precision, and braking capability.
- Suspension – With a heavy load, the riding characteristics and balance of the motorcycle will change. On some motorcycles, it may be necessary to adjust suspension settings (spring preload, compression/damping, etc.) to compensate for the lowered rear end. Refer to the owner’s manual for adjustment procedures and specifications.
- Headlight – Prior to loading, position the motorcycle about 10 feet from a wall in an unlit garage and mark the headlight beam location on the wall with chalk. With a full load and passenger, recheck the headlight beam location. Use the adjusting screws on the headlight to lower the beam to the same height. Check your owner’s manual for the adjustment procedure.
PASSENGER
Equipment for Carrying Passengers
- Be sure your passenger is properly attired, wearing the same level of personal protective gear as you.
- Be sure your motorcycle is equipped with passenger footrests.
- Your motorcycle should have a proper seat, one large enough to hold both you and your passenger without crowding. You should not sit more forward than you usually do.
- Check that there is a strap or solid handholds for your passenger to hold onto.
Preparing Your Passenger to Ride
Ensure your passenger can reach the passenger footrests and hold on to your waist, hips, belt, or the bike's passenger handholds. Children should be placed immediately behind the rider. A child sitting in front of the rider will not be able to properly balance him/herself and may interfere with the rider’s control of the motorcycle.
Passenger safety begins with proper instruction. Riders should not assume that passengers are familiar with motorcycle handling, control, or balance. As a routine practice, always instruct your passenger on the basics prior to starting the trip, even if your passenger is a motorcycle rider.
As you prepare for your ride, tell your passenger to:
- Get on the motorcycle only after you have started the engine and have the transmission in neutral. As the passenger mounts, keep both your feet on the ground and the front brake applied.
- Sit as far forward as possible without hindering your control of the motorcycle.
- Hold firmly onto your waist, hips, belt, or passenger handholds for balance and security.
- Keep both feet firmly on the footrests, even when stopped. A firm footing will prevent your passenger from falling off and pulling you off.
- Keep legs away from the muffler(s), chains or moving parts.
- Stay directly behind you and lean with you through turns and curves. It is helpful for the passenger to look over the rider's shoulder in the direction of turns and curves.
- Avoid unnecessary conversation and avoid leaning or turning around. Make no sudden moves that might affect the stability of the motorcycle.
- Rise slightly off the seat when crossing an obstacle.
Also, remind your passenger to tighten his or her hold when you:- Approach surface hazards such as bumps or uneven road surfaces.
- Are about to start from a stop or begin moving into traffic.
- Are about to turn sharply or make a sudden move.
Riding With Passengers
Your motorcycle will respond differently when you ride with a passenger. The heavier your passenger, the longer it may take to speed up, slow down, or turn.
When riding with passengers:
- Ride a little slower, especially when taking curves, corners, or bumps. If any part of the motorcycle scrapes the ground at a lean angle, steering control can be lost.
- Start slowing earlier as you approach a stop, and maintain a larger space cushion whenever slowing or stopping.
- Wait for larger gaps to cross, enter, or merge into traffic.
CARRYING LOADS
Everything you are likely to need for a riding holiday or weekend trip can be packed on your motorcycle in many different ways. There are complete luggage systems, saddlebags that are permanently attached to the motorcycle, soft bags that do not require a carrier system and can be tied to the seat, and a tank bag for other small items. You can also travel simply with only a backpack. Whatever you decide, do not exceed the gross vehicle weight rating when traveling with cargo and a passenger, and always make adjustments to the motorcycle to compensate for the added weight.
Tips for Traveling with Passengers and Cargo
- Try to place the load over, or in front of, the rear axle. Mounting loads behind the rear axle can affect how the motorcycle turns and brakes. It can also cause a wobble.
- Plan your route and length of each day’s riding segment and allow plenty of time for breaks. Poor weather, breakdowns, and fatigue are always possible.
- Consider using secondary roads occasionally to reduce the monotony of multi-lane highways.
- Take a short break every hour or so. Eat healthy snacks and drink plenty of water.
- Don’t forget sun protection in the summer. Some riding gear combinations can leave your neck exposed, risking sunburn.
- If you wear a backpack, be sure it is securely attached to you. Try adjusting the shoulder straps so the backpack rests lightly on the seat. This will reduce the tension in your neck and shoulders.
- If you have a tank bag, be sure it is securely mounted and does not obstruct your view of the controls or instruments. If necessary, pack it only partially full. When strapping the tank bag in place, make sure it does not catch any brake lines or cables around the steering head.
- Secure loads low, or put them in saddlebags. Attaching a load raises the motorcycle’s center of gravity and can upset its balance.
- If you use saddlebags, load each with about the same weight. An uneven load can cause the motorcycle to pull to one side. Overloading may also cause the bags to catch in the wheel or chain, locking the rear wheel and causing the motorcycle to skid.
- Fasten the load securely with elastic cords (bungee cords or nets.) Elastic cords with more than one attachment point per side are recommended. A loose load could catch in the wheel or the chain, causing it to lock up and resulting in a skid. Rope can stretch, and knots can come loose, permitting the load to shift or fall. You should stop and check the load frequently to ensure it is not shifted or loosened.
- Include a small tool kit and some common spare parts that you might need.
- Water and some energy bars or other food should also be part of your preparation, and don’t forget a first aid kit.
PRE-RIDE TEST
Prior to starting out, take a test ride with your fully loaded motorcycle through some familiar neighborhood roads to get a feel for the operation. Be sure the suspension settings are correct, and that the side stand, footrests, and exhaust pipes don’t scrape over bumps and in turns. Ensure the tank bag does not get in the way of the handlebars or restrict the steering. Also, check the load's security so your luggage does not hit you in the back during maximum braking.
You will also find that the performance of a fully loaded motorcycle will be different than what you are used to. Test the power when accelerating and be aware that it will be lower, increasing passing times and distances. Braking will also feel different, and stopping distances may increase.
Group Riding
PREPARATION
Preparing yourself for a group ride is as important as making sure your motorcycle is ready. Riding with a group requires an alert mind free of worries, distractions, and stress. It also means riding free from the influence of alcohol or drugs. For some, even too much caffeine or prescription drugs can adversely affect concentration.
Prior to a long trip, it’s a good idea to have your motorcycle serviced at your local dealership if you aren’t able to do the work yourself. A thorough pre-ride check is a must. Use the T-CLOCS checklist as a reminder of the important components to check before you leave. Remember to consider variables such as passenger load and cargo weight, which may require a change in tire pressure or suspension adjustment.
PLAN
Before starting out, hold a rider’s meeting to discuss the route, length of riding segments, rest stops, and locations for fuel, meals, and lodging. Make sure everyone knows the route. That way, if someone becomes separated, he or she won’t have to hurry to keep from getting lost or making the wrong turn. Choose a lead rider and a sweep rider.
These should be the most experienced riders of the group. The lead rider should look ahead for changes in road, traffic, or weather conditions, and signal early so the word gets back to the other riders in plenty of time. The sweep rider is the last rider in the group and sets the pace. Place inexperienced riders just behind the leader. That ensures that they won’t have to chase after the group, and the more experienced riders can watch them from the back.
The most important rules for group riding are: no competition, no passing of other riders, and no tailgating. If a rider insists on riding faster than the group, allow him or her to go ahead to an agreed meeting point.
HAND SIGNALS
During the rider’s meeting, review the hand signals so all riders can communicate during the ride. A diagram of the common hand signals is at the end of this manual.
OBSERVE THOSE BEHIND
During the ride, use your mirrors to keep an eye on the person behind and confirm that the group is staying together. If a rider falls behind, everyone should slow down to keep the group together.
KEEP YOUR DISTANCE
Maintain close ranks, but also maintain an adequate space cushion to allow each rider in the group time and distance to react to hazards. A close group takes up less space on the highway, is easier to see, and is less likely to become separated. This must, however, be done properly.
DON'T PAIR UP
Never ride directly alongside another rider in the same lane. There is no place to go if you have to maneuver to avoid a car or hazard in the roadway. Wait until you are both stopped to talk.
STAGGERED FORMATION
This is the best way to keep the ranks close yet maintain an adequate space cushion. The group leader rides in the left side of the lane, and the second rider stays at least one second back and rides in the right side of the lane. The third maintains the left position of the lane, at least two seconds behind the first rider. The fourth rider should keep at least a two-second distance from the second rider in the right side of the lane, and so on. This formation keeps the group close and permits each rider to maintain a safe distance from others ahead, behind, and to the sides.
It is best to move to a single-file formation when riding in curves, turning, and entering or leaving freeways or highways. Be sure to keep a proper following distance.
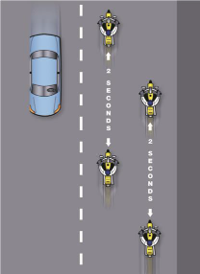
Staggered Formation
INTERSECTIONS
Intersections present the highest risk for motorcyclists in a group. When making a left turn at an intersection with a left turn signal arrow, tighten the formation to allow as many riders through the intersection as possible. Make the turn single file – do not ride side-by-side. If not all riders get through the light, stop at a safe point ahead and wait. This will prevent riders from feeling pressured to speed up or run a red light.
INTERSTATE FREEWAYS AND HIGHWAYS
A staggered formation is essential when riding on freeways and interstates. However, enter in single file and form up only after all riders have safely merged in traffic. The lead rider should move the group over at least one lane to prevent vehicles that are entering and exiting from disrupting your formation. In heavy traffic, resist the temptation to ride too close together. Maintain a minimum one-second, two-second staggered formation space cushion. When exiting, use a single-file formation for a better space cushion and time to react to conditions at the end of the off-ramp.
PARKING
When possible, park as a group, so everyone can get off their motorcycles more quickly. Avoid parking downhill or head-in, and, if possible, park where you can pull through to make arrival and departure smoother. Whenever possible, park so that the group can depart as a unit in a single file.
PASSING IN FORMATION
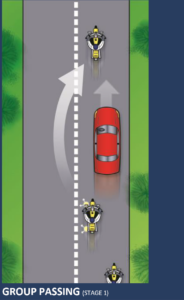
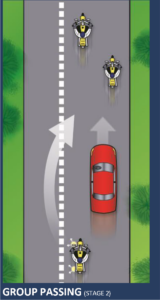
When the group wants to pass slow traffic on a freeway or interstate, the group may pass as a unit. On a two-lane highway, riders in a staggered formation should pass one at a time.
- First, the lead rider should pull out and pass when it is safe. After passing, the leader should return to the left position and continue riding at passing speed to open room for the next rider.
- Next, the second rider should move up to the left position in the lane and wait for a chance to safely pass. When passing, be sure you have a clear view of oncoming traffic. Just because the lead rider passed, that does not mean that conditions haven’t changed and that it is still safe for other riders to pass. After passing, the rider should return to the right position and open up room for the next rider.
Some people suggest that the lead rider should move to the right side of the lane after passing the vehicle. This is not a good idea, since it might encourage the second rider to pass and cut back in before there is enough space cushion in front of the passed vehicle. It’s simpler and safer to wait until there is enough room ahead of the passed vehicle to allow each rider to move into the same position held before the pass.
TEN RULES OF GROUP RIDING
- Base the length of the route and segments on the ability of the least experienced rider.
- Take timely breaks to prevent loss of concentration and reduce fatigue.
- Adjust the pace through curves to the ability of the least experienced rider. If necessary, form two groups with different speeds.
- Don’t tailgate or encourage the rider in front to speed. If you want to ride faster, ride well ahead of the group.
- Keep adequate following distance and maintain a staggered formation.
- Do not pass within the group, except in the case of an emergency.
- Place inexperienced riders just behind the leader so they can keep pace without riding faster than it is safe.
- When passing, be conscious of the traffic conditions and oncoming traffic. Even though the previous riders passed safely, it may not be safe for you.
- Maintain adequate time distance between riders, especially at intersections. This allows you to avoid hard braking.
- Check your mirrors frequently to ensure the group stays together.
TEST YOUR KNOWLEDGE
- When riding, you should.
- Turn your head and shoulders to look through turns.
- Keep your arms straight.
- Keep your knees way from the gas tank.
- Turn just your head and eyes to look where you are going.
- Usually, a good way to handle tailgaters is to.
- Change lanes and let them pass.
- Use your horn and make obscene gestures.
- Speed up to put distance between you and the tailgater.
- Ignore them.
- To reduce your reaction time, you should.
- Ride slower than the speed limit.
- Cover the clutch lever and the brakes.
- Shift into neutral when slowing.
- Pull the clutch when turning.
- Making eye contact with other drivers.
- Is a good sign they see you.
- Is not worth the effort it takes.
- Doesn't mean that the driver will yield.
- Guarantees that the other driver will yield to you.
- Reflective clothing should.
- Be worn at night.
- Be worn during the day.
- Not be worn.
- Be worn day and night.
- The best way to stop quickly is to.
- Use the front brake only.
- Use the rear brake first.
- Throttle down and use the front brake.
- Use both brakes at the same time.
- When it starts to rain it is usually best to.
- Ride in the center of the lane.
- Pull off the side until the rain stops.
- Ride in the tire tracks left by cars.
- Increase your speed.
- If you are chased by a dog.
- Kick it away.
- Stop until the animal loses interest.
- Swerve around the animal.
- Approach the animal slowly, then speed up.
- Passengers should.
- Lean as you lean.
- Hold on to the motorcycle seat.
- Sit as far back as possible.
- Never hold onto you.
- When riding in a group, inexperienced riders should position themselves.
- Just behind the leader.
- In front of the group.
- At the tail end of the group.
- Beside the leader.
- It is MOST important to flash your brake light when.
- Someone is following too closely.
- You will be slowing suddenly.
- There is a stop sign ahead.
- Your signals are not working.
- The FRONT brake supplies how much of the potential stopping power.
- About 25%.
- About 50%.
- At least 70%.
- All of the stopping power.
- To swerve correctly.
- Shift your weight quickly.
- Turn the handlebars quickly.
- Press the handgrip in the direction of the turn.
- Press the handgrip in the opposite direction of the turn.
- If a tire goes flat while riding and you must stop, it is usually best to.
- Relax on the handgrips.
- Shift your weight toward the good tire.
- Brake on the good tire and steer to the side of the road.
- Use both brakes and stop quickly.
Test answers: (1) 4; (2) 1; (3) 2; (4) 1; (5) 1; (6) 4; (7) 3; (8) 4; (9) 1; (10) 1; (11) 1; (12) 3; (13) 4; (14) 3